workshop_quality_check_manager
| Site: | NiryoAcademy |
| Course: | ROS 2 Workshop: Implementing and Optimizing Factory Automation |
| Book: | workshop_quality_check_manager |
| Printed by: | Guest user |
| Date: | Monday, 11 May 2026, 2:38 PM |
Hansel Biermann's Report
Introduction
During my internship in Basel, I was tasked with integrating a Niryo Ned3 Pro robot into a quality check line. The main goal was to sort chemical products in vials between safe and unsafe categories (classified according to their color) and place the safe ones in a packaging line, which will be created by a french fellow that worked with me on the global project.
The robot was equipped with a conveyor belt with an IR sensor to detect the presence of a vial. The robot was also equipped with a customized gripper to pick and place the vials. To check the safety of each vial, we created a testing zone composed by a standard camera and a plate. The camera is plugged to a Raspberry Pi where the safety testing is proceeded. The camera view is displayed to a screen with some logs via an HDMI cable.
To perform that I will propose two ROS2 packages, that will handle both robot's and raspberry's tasks.
Network Configuration - IMPORTANT!
Before starting this part of the workshop, you need to configure your ROS 2 network settings to communicate with your assigned quality check cell and its Raspberry Pi.
Check the ROS_DOMAIN_ID written on your Raspberry Pi or workstation label - this is the domain ID assigned to your quality check cell.
Edit your ~/.bashrc file (located at ~/.bashrc locally or /root/.bashrc in the devcontainer):
- Change the discovery range from LOCALHOST to SUBNET:
export ROS_AUTOMATIC_DISCOVERY_RANGE=SUBNET - Set your assigned domain ID (replace XX with the number from your Raspberry Pi/workstation):
export ROS_DOMAIN_ID=XX # Use the domain ID written on your Raspberry Pi - Apply changes by sourcing your bashrc or opening a new terminal:
source ~/.bashrc
Why SUBNET? This allows ROS 2 to discover nodes across your local network (including the Raspberry Pi on a different machine), while your assigned ROS_DOMAIN_ID ensures you only communicate with your quality check cell and don't interfere with other teams.
My Solution
💡 Hey ! I'm the narrator, I'll be guiding you sometimes to help you test the code. To begin with Hans-Gunter's solution let's open the
quality_check_node.pyfile in the/roscon-2025/workshop/workshop_quality_check_manager/scripts/quality_check_node.pydirectory at the side of this document for the robot side and thedetection.pyfile of theworkshop_rpi_managerpackage for the raspberry side. The report is written by Hansel as "I". Please read it and complete the missing methods when he explained how he did it.
Robot side
On the robot side we provide a ROS2 package that handles the robot's task, starting with a pick and place action when an object is detected by the IR sensor, from the conveyor belt to the testing zone. Once the safety state of the vial is received fom the raspberry, the robot will move to the packaging line to place the vial if it's safe, or to the reject zone if it's unsafe.
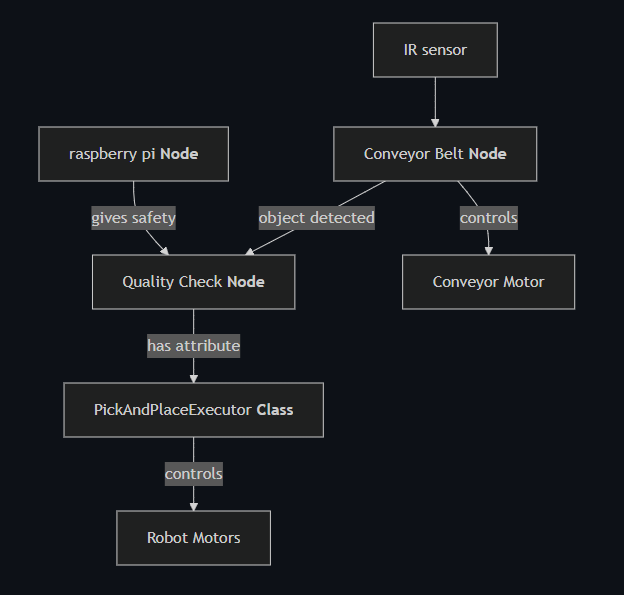
For the realization of this pakcage I propose the following architecture :
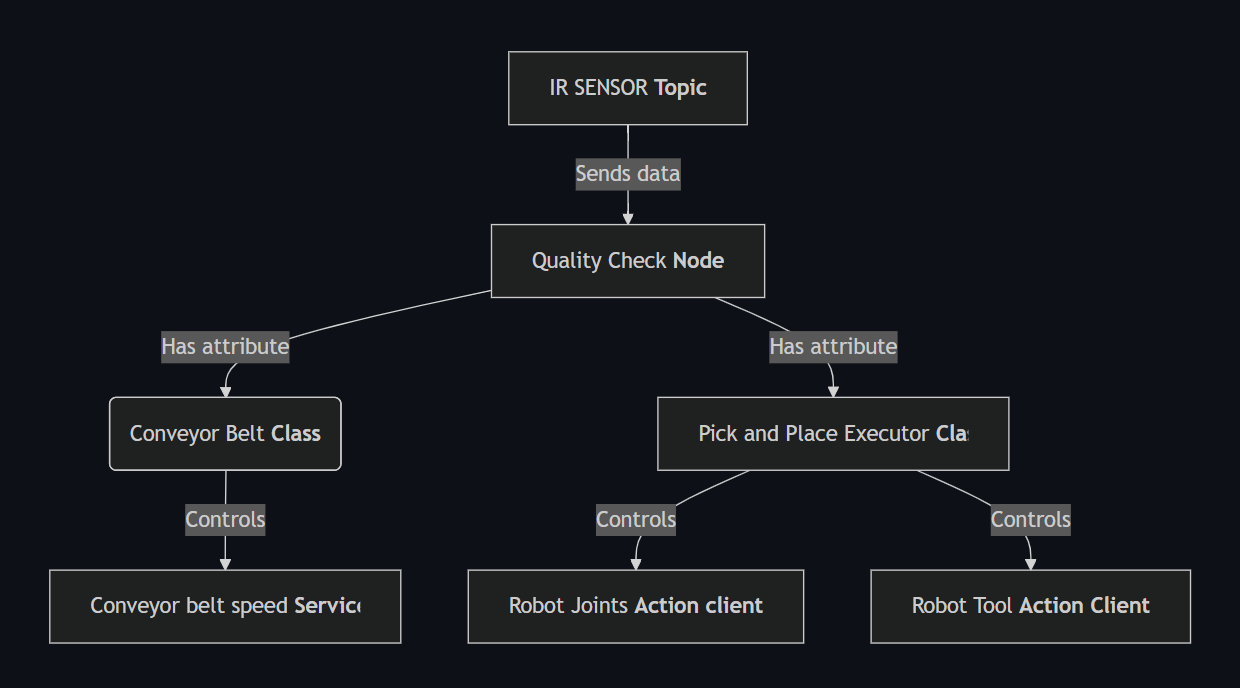
Starting with the main Class, the Quality Check Node
It starts with the initialization of the parameters :
# --- Parameters ---
self.conveyor_id = self.declare_parameter("conveyor_id", 9).get_parameter_value().integer_value
self.speed = self.declare_parameter("speed", 60).get_parameter_value().integer_value
self.sensor_index = self.declare_parameter("sensor_index", 4).get_parameter_value().integer_value
self.digital_state_topic = self.declare_parameter(
    "digital_state_topic", "/niryo_robot_rpi/digital_io_state"
).get_parameter_value().string_value
self.conveyor_service = self.declare_parameter(
    "conveyor_service", "/niryo_robot/conveyor/control_conveyor"
).get_parameter_value().string_value
self.robot_action = self.declare_parameter(
    "robot_action", "/niryo_robot_arm_commander/robot_action"
).get_parameter_value().string_value
self.tool_action = self.declare_parameter(
    "tool_action", "/niryo_robot_tools_commander/action_server"
).get_parameter_value().string_value
self.tool_id = self.declare_parameter("tool_id", 11).get_parameter_value().integer_value
self.max_torque_percentage = self.declare_parameter("max_torque_percentage", 100).get_parameter_value().integer_value
self.hold_torque_percentage = self.declare_parameter("hold_torque_percentage", 100).get_parameter_value().integer_value
The niryo conveyor belt has an ID of 9 by default. The id is nevertheless set as a parameter to be able to use another conveyor belt if needed in a future implementation.
The speed parameter describes the percentage of the conveyor belt max speed. I decided to set it by 60% by default because after some tests, I found that higher speeds were not stable enough for the robot to pick and place the vials.
The sensor_index parameter is used to get the index of the digital input that is used to detect the presence of a vial. I decided to set it to 4 by default because the IR sensor is the fourth digital input of the robot by default. Nevertheless, it is set as a parameter to be able to use another sensor if needed in a future implementation.
The topic, services and actions names are also set as parameters in order to be able to change it if the niryo's API changes in the future. The default values are the ones used in the Niryo Ned3 Pro robot as today.
The tool_id is set as a parameter as it is different for every Gripper and Tool of the Niryo Brand. For this application we modified a Custom Gripper to be able to pick the vials. The default value is thus the one of the Custom Gripper (11).
Finally, the max_torque_percentage and hold_torque_percentage parameters are by default set to 100% because maximum force is needed for the vials to be grabbed. They are set as parameters to be able to re-use the code for other applications in the factory.
Then, the node loads the poses from the poses.yaml file.
# --- Poses ---
default_poses_path = os.path.join(
    get_package_share_directory("ned3pro_quality_check_manager"), "config", "poses.yaml"
)
poses_path = self.declare_parameter("poses_path", default_poses_path).get_parameter_value().string_value
with open(poses_path, "r") as f:
    poses_file = yaml.safe_load(f)
poses = poses_file.get("poses", {})
As described in the schema, the node creates a Conveyor Controller and a Pick and Place Executor. It distributes the corresponding parameters to the two classes.
# --- Helpers ---
self.conveyor = ConveyorController(self, self.conveyor_service, self.conveyor_id, self.speed)
tool_cfg = {"id": self.tool_id, "max": self.max_torque_percentage, "hold": self.hold_torque_percentage}
self.pick_place = PickAndPlaceExecutor(self, self.robot_action, self.tool_action, poses, tool_cfg)
We finally subscribe to the digital state topic and the safety state topic, as well as creating 2 variables to store the last object detected and the last safety state received from the raspberry.
# --- State ---
self._last_object_detected = None
self._last_safety_state: str | None = None

# --- Subscription ---
qos = QoSProfile(
    reliability=ReliabilityPolicy.RELIABLE,
    history=HistoryPolicy.KEEP_LAST,
    depth=10,
)
self.create_subscription(DigitalIOState, self.digital_state_topic, self._on_digital_state, qos)
self.create_subscription(String, "/safety_state", self._on_safety_state, 10)
We also introduce a QoS Profile to ensure that the messages from the IR sensor are never lost if a new object is detected. We chose the RELIABLE policy to prevent any loss of data and ensure maximum safety. We also keep the last 10 messages in memory to avoid any loss of data and use the last messages to be stored to be up to date at each time. Remember: always put safety first!
💡 Tip: For now, you will note that the methods of your classes are empty. From the instructions given by Hansel, complete the missing methods to be able to reproduce the intern solution.
Both subscriptions lead to the executions of the respectives methods _on_digital_state and _on_safety_state.
The IR sensor returns a boolean value, stored in the 5th index of the digital inputs table. This table is a list of boolean values, each representing the state of a digital input and published each time there is a change of at least one digital input. I decided to define the subscription to the digital_state_topic here as the IR sensor is plugged to the robot and not to the conveyor belt in real life.
The message is a DigitalIOState message type. The value is 1 when no object is detected, and 0 when an object is detected. Meaning we should invert it before placing it in the variable _last_object_detected.
The safety state is a string value. It is published on the safety_state topic and the message data can be directly stored in the variable _last_safety_state.
For these two methods, we consider implementing a simple error handling to avoid any crash of the node, especially for the digital_state topic, as the index can be an invalid parameter (i.e not in the list).
💡 Tip: You can begin by writing the method and print the result to see if it works. You can put your hand in front of the IR sensor and see if the returned value is correctly updated. For the
_on_safety_statemethod, you can publish a string in a terminal using aros2 topic pubcommand to see if it is correctly received by your code.
The ConveyorController class is responsible for controlling the conveyor belt. It is initialized with the parameters passed to the node and creates a service client to control the conveyor belt :
    def __init__(self, node: Node, service_name: str, conveyor_id: int, speed: int) -> None:
        self._node = node
        self._client = node.create_client(ControlConveyor, service_name)
        self._conveyor_id = conveyor_id
        self._speed = speed
        self._current_state = None

        if not self._client.wait_for_service(timeout_sec=5.0):
            self._node.get_logger().error(f"Service {service_name} not available !")
The only method to implement in this class is the set_running method, that is used to control the speed of the conveyor belt.
To set the speed of the conveyor belt, we create a request to the service client and set the speed to the desired value along with the direction of the conveyor belt.
To create the request, we first create a ControlConveyor.Request object.
req = ControlConveyor.Request()
Here is the request type to control the conveyor belt :
uint8 id
bool control_on
int16 speed
int8 direction
control_on should be set to True to activate the conveyor belt.direction is set to 1 for the conveyor belt running in the direction of the robot, 0 to be stopped and -1 to be running in the opposite direction.
This method should also update the current_state variable to the new state of the conveyor belt.
To send the request we use the call_async method of the service client.
future = self._client.call_async(req)
rclpy.spin_until_future_complete(self._node, future)
💡 Tip : At this point you can also test your method by calling it from the main loop of the node, try to start and stop the conveyor belt and see if everything is working !
The PickAndPlaceExecutor class is responsible for controlling the robot's task. It is initialized with the parameters passed to the node and creates two action clients to control the robot's and tool's movements.
    def __init__(self, node: Node, robot_action: str, tool_action: str, poses: dict, tool_cfg: dict) -> None:
        self._node = node
        self._robot = ActionClient(node, RobotMove, robot_action)
        self._tool = ActionClient(node, Tool, tool_action)
        self._poses = poses
        self._tool_cfg = tool_cfg
In this class, I implemented 2 methods, each responsible for the control of the robot's and tool's movements. They are called _move and _tool_cmd and send a goal to the respective action servers.
Note that we can instantiate a goal using in each method
goal = RobotMove.Goal()
goal = Tool.Goal()
Here is the goal type to control the robot's movements :
int32 JOINTS = 0            # uses joints
int32 POSE = 1               # uses position and rpy
int32 POSITION = 2           # uses position
int32 RPY = 3                # uses rpy
int32 POSE_QUAT = 4          # uses position and orientation
int32 LINEAR_POSE = 5        # uses position and rpy
int32 SHIFT_POSE = 6         # uses shift
int32 SHIFT_LINEAR_POSE = 7  # uses shift
int32 EXECUTE_TRAJ = 8       # uses dist_smoothing, list_poses
int32 DRAW_SPIRAL = 9
int32 DRAW_CIRCLE = 10
int32 EXECUTE_FULL_TRAJ = 11
int32 EXECUTE_RAW_TRAJ = 12

int32 cmd_type

int32 LEGACY = 1
int32 DH_CONVENTION = 2
int32 tcp_version

float64[] joints
geometry_msgs/Point position
niryo_robot_msgs/RPY rpy
geometry_msgs/Quaternion orientation
niryo_robot_arm_commander/ShiftPose shift

geometry_msgs/Pose[] list_poses
float32 dist_smoothing

trajectory_msgs/JointTrajectory trajectory

float64[] args
We here only want to move the robot using joint positions, the cmd_type is set to 0.
For the tool, we use the Tool action server to control the tool's movements :
# Gripper
int8 OPEN_GRIPPER = 1
int8 CLOSE_GRIPPER = 2

uint8 cmd_type

int8 tool_id

uint8 max_torque_percentage
uint8 hold_torque_percentage
To set a goal to an action we use the send_goal_async method of the action client.
        send_future = self._tool.send_goal_async(goal)
        rclpy.spin_until_future_complete(self._node, send_future)
        goal_handle = send_future.result()
        if not goal_handle.accepted:
            self._node.get_logger().error("command rejected")
            return
        result_future = goal_handle.get_result_async()
        rclpy.spin_until_future_complete(self._node, result_future)
💡 Tip: At this point test your movement implementation by trying to make your robot move from a random pose to a basic joint position and to open and close the gripper.
With this base, we have everything to perform our application. I will now describe the path I followed to implement my solution.
In my head, I like to have everything clear, separated and easy to understand. I thus, divided the work into bricks that make a chain of actions. Here is the diagram that explains the path of resolution for the application.
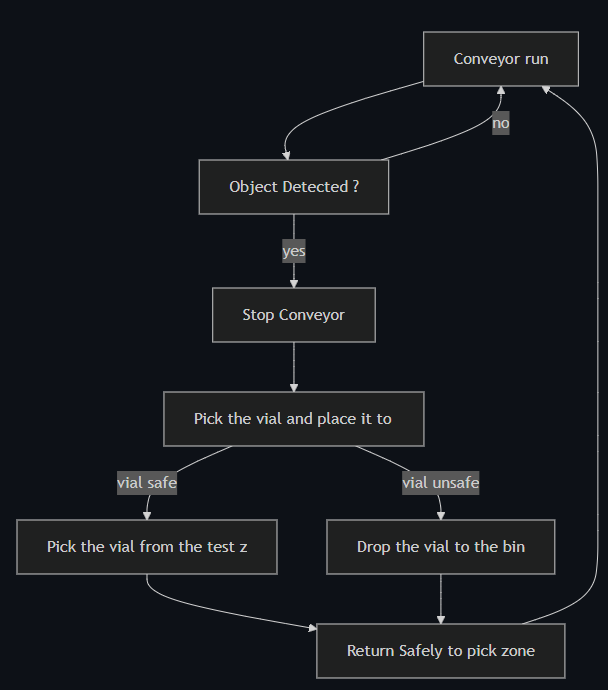
The run_loop method is the one called by the main function, every time it is called we make the node spin once, in order to execute all the actions previously stated.
We begin by verifying if an object has been detected by the IR sensor, in this case we want to ensure that the conveyor is running. We then want to return to the beginning of the loop to wait for the next object, this can be performed in python by using a continue statement.
If an object is detected, we call our set_running method from the conveyor controller to stop the conveyor belt.
Now here comes the fun part. We need to perform the pick and place operation. As previously stated, I decided to split the operation into two phases. The first pick and place the vial to the test zone, then leave the camera field of view. And the second phase is to pick the vial from the test zone to the packaging conveyor, or to the bin if it's unsafe and then return safely to the pick zone.
I am a very precautionary person, so I used all my mind to engineer the safest path for the robot to perform this operation. A good thing to know with Niryo robots is that you can use the Freemotion button, located on the robot's forearm, to move the robot's hand freely. This is very useful to take positions in real life and reproduce them in the code. I stored all these position as joint states in the poses.yaml file. To record the positions I listened to the joint_states topic.
For the first phase, I took 4 positions to perform the pick and place. The first one is the grip position where the robot hand is opened and ready to receive a vial. Then I want the robot to close the gripper and slowly move in a vertical line to raise the vial to an upper position called high1. Then, the robot turns to its left to the high2 position making a circle trajectory until the vial is just above the test zone. And then we perform a vertical straight line to the low1 position where the robot opens the gripper and slowly moves back to the high2 position to safely leave the camera field of view.
💡 Tip: Fill the empty poses.yaml file using the same syntax that explained while loading the poses. You can write a simple script such as record_pose.sh which calls the topic once and record it in a file in the good format.
#!/bin/bash
# Record one /joint_states message and save its positions to a YAML file.
# Usage: ./record_joint_pose.sh pose_1 my_poses.yaml
#        ./record_joint_pose.sh <pose_name> <output_yaml>
set -e
POSE_NAME=$1
OUTPUT_FILE=$2
if [ -z "$POSE_NAME" ] || [ -z "$OUTPUT_FILE" ]; then
  echo "Usage: $0 <pose_name> <output_yaml>"
  exit 1
fi

echo "Waiting for one message on /joint_states..."
# Get one message and extract the 'position' array
POSITIONS=$(ros2 topic echo /joint_states --once --no-arr | \
  grep "position" | head -n 1 | \
  sed 's/.*\[\(.*\)\].*/\1/' | tr -d ' ')

# Convert to YAML list format
YAML_LIST="[${POSITIONS}]"

# Write to YAML file
echo "${POSE_NAME}: ${YAML_LIST}" >> "${OUTPUT_FILE}"
You should here record 4 poses, as explained in the report.
When the safety response is received, we go back to the low1 position, grab the vial and move to the safe or unsafe position depending on the safety state passing by the high2 position to ensure maximum safety.
When the second pick and place is performed, we return to the grip position to wait for the next object, obviously passing back by the high2 and high1 positions to ensure maximum safety, as we want the robot to arrive in a straight line to the conveyor belt before setting it back to run and resetting the last_object_detected variable because safety first, we never know!
💡 Tip: For now, follow the instructions given by Hansel to complete the missing run loop. Fill the poses.yaml file with the positions you took. You can create some methods on the pick and place executor to perform the two phases and make the code more readable. The correction for the intern solution is in the /ned3pro_quality_check_manager/scripts/quality_check_node_intern.py file.
Raspberry side
The client had some requirements about performances. That's why they asked us to create an interactive interface that can display the internal state of the whole system. As I wanted my client to have the best experience possible, that is to say: a performative, free to use and lightweight HMI. Hence, I obviously typed into google, "Best HMI 2025 free download no virus no toolbars" and found this gem: hmi_standard.py
This HMI uses a web interface. It is also compatible with ROS2 and subscribes by default to the quality_check/safety_state topic and the rpi_manager/frame topic, which is supposed to be the image taken by the camera.
It displays: the overall state of the system, the image taken by the camera, the latest safety state detected, the numbers of objects taken in charge today and the proportionality of them being unsafe. It also calculates the average time to perform a pick and place operation.
Another function of the Raspberry Pi was to perform the quality check itself. To perform that, we have a testing zone where a vial is placed by the QC robot. I was given a pre-trained YOLO v8 model to detect the safety state of the vial. The model is trained to detect the safety state of the vial, meaning that it can detect if the vial is safe or unsafe. I was also given this link which shows the dataset on which the model was trained.
To perform the quality check, I created a script into the raspberry pi manager package. This script is called detection.py. It has a main class that is called DetectionNode. It is initialized with the model path, the camera index and the topic name to publish the safety state. It also loads the AI model that is based on YOLO v8.
def __init__(self) -> None:
    super().__init__('detection')
    self.get_logger().info('detection node initialised')

    model_path = "/workspaces/roscon-2025/src/assets/safety_check_model.pt"
    if not os.path.exists(model_path):
        self.get_logger().error(f"Model not found: {model_path}")
        self.model = None
    else:
        try:
            self.model = YOLO(model_path)
            self.get_logger().info("YOLO v8 model loaded successfully")
        except Exception as e:
            self.get_logger().error(f"Error loading model: {e}")
            self.model = None

    self.cap = cv2.VideoCapture(0)
    if not self.cap.isOpened():
        self.get_logger().error("Impossible to open the camera")
        self.cap = None
    else:
        self.get_logger().info("Camera initialised successfully")

    try:
        self.cap.set(cv2.CAP_PROP_BUFFERSIZE, 1)
        self.get_logger().info(
            f"Camera buffer size set: {self.cap.get(cv2.CAP_PROP_BUFFERSIZE)}"
        )
    except Exception as e:
        self.get_logger().warn(f"Could not set camera buffer size: {e}")

    self.publisher_ = self.create_publisher(String, '/quality_check/safety_state', 10)
💡 Tip: Go to the Raspberry Pi and open the
rpi_manager/scripts/detection.pyto continue the workshop. Complete the solution as explained by Hansel.
Then I asked myself, How can the quality check be performed on the Raspberry Pi, and then be sent to the Robot's Node? What a tricky question for my mind, but I found out and remembered that we were using ROS2. Even if I do not know a lot about ROS2, I know that main part of the communication is done through topics. So I created a publisher to the quality_check/safety_state topic to publish the safety state, and attached a timer to publish the safety state. I wanted to have the best performances possible, so I measured the mean time for the robot to perform a trajectory and I found out it was approximately 5 seconds. I thus set the timer to 5 seconds to ensure that the safety state is published at the right time, i.e., when the robot performed its full trajectory.
self.timer_ = self.create_timer(5.0, self._on_timer)
Inside the timer callback, the logic should be simple. We can use the camera to take an image via opencv-python (or cv2). **You might have to install it on the Raspberry Pi if this has not been done already.**
# Empty opencv buffer
_ = self.cap.grab()
ret, frame = self.cap.read()
ret is a boolean value that is True if the image is successfully captured, False otherwise. frame is the image captured by the camera.
At this time I remembered I have to publish the image to the rpi_manager/frame topic, so that the HMI can display it. I used the cv_bridge library to convert the image to a sensor_msgs/Image message.
from cv_bridge import CvBridge
from sensor_msgs.msg import Image
self.bridge = CvBridge()
self.image_publisher = self.create_publisher(Image, '/rpi_manager/frame', 1)
image_msg = self.bridge.cv2_to_imgmsg(frame, "bgr8")
self.image_publisher.publish(image_msg)
💡 Tip: Implement the missing methods following the steps explained before.
I know that inference run on a CPU is not the best idea, as it can be very slow. I had an idea which was to process the image before sending to the model, so that it can be more lightweight, while fitting the model's dataset. A human brain has around 10 Billion neurons, while ChatGPT has around 175 Billion neurons. So I decided to prompt ChatGPT to address the most optimized filters to apply to the image to fit the model's dataset while being as performative as possible.
This is the prompt I used:
Give me the code in python to process an image that merges red and blue in one mask and the rest in another one. Put the other one to a gray scale and optimize my image so that I have the best performances possible.
It directly returned the code, so I pasted it in my script and it got built!
filtered_image = self._apply_performative_filters(frame)

def _apply_performative_filters(self, frame):
    performative_filters = cv2.resize(frame, (256, 144), interpolation=cv2.INTER_NEAREST)

    hsv = cv2.cvtColor(performative_filters, cv2.COLOR_BGR2HSV)

    lower_red1 = np.array([0, 120, 70])
    upper_red1 = np.array([10, 255, 255])
    lower_red2 = np.array([170, 120, 70])
    upper_red2 = np.array([180, 255, 255])
    mask_red1 = cv2.inRange(hsv, lower_red1, upper_red1)
    mask_red2 = cv2.inRange(hsv, lower_red2, upper_red2)
    mask_red = cv2.bitwise_or(mask_red1, mask_red2)

    lower_blue = np.array([100, 150, 50])
    upper_blue = np.array([140, 255, 255])
    mask_blue = cv2.inRange(hsv, lower_blue, upper_blue)

    mask = cv2.bitwise_or(mask_red, mask_blue)

    gray = cv2.cvtColor(performative_filters, cv2.COLOR_BGR2GRAY)
    gray_bgr = cv2.cvtColor(gray, cv2.COLOR_GRAY2BGR)

    purple = np.full_like(performative_filters, (128, 0, 128))

    result = np.where(mask[..., None].astype(bool), purple, gray_bgr)

    return result
I then coded a method to get the safety state from the model:
safety_state = self._get_safety_prediction(filtered_image)
The method _get_safety_prediction is a bit more complex. It is based on the YOLO v8 model. To predict the class from a YOLO model we can use:
results = self.model.predict(filtered_image, verbose=False)
It returns a list of results, each result being a dictionary containing the class name and the confidence score.
Using YOLO methods, we can extract the class name and the confidence score from the result.
class_name = results[0].names[results[0].probs.top1]
confidence_score = results[0].probs.top1conf.item()
We finally return the safety state, which is either "safe" or "unsafe".
return "safe" if class_name.lower() == "safe" else "unsafe"
I then published the safety state to the topic:
msg = String()
msg.data = safety_state
self.publisher_.publish(msg)
💡 Tip: you can test your code by listening to the
safety_statetopic; something should be published every 5 seconds as a string.
Note that I was not able to see the parameters applied to the camera on the HMI. I thought that maybe human eye cannot make the difference between processed and unprocessed image as GPT, which I think is not human, decided on the parameters. But I 100% trust GPT as it has more neurons than me.
To make the conveyor run, you need to initialize it by calling a Niryo service. You just have to call it once, not each time you run the program.
ros2 service call /niryo_robot/conveyor/ping_and_set_conveyor niryo_ned_ros2_interfaces/srv/SetConveyor "{cmd: 1, id: 9}"
On the Raspberry side, make sure the Python packages opencv-python and ultralytics are installed.
Professor's Feedback
Satisfactory overall job (3.5)! Even if the code is not perfect and the requests of the client are not fully fulfilled, the code is working and the robot is performing the task safely concerning the trajectory part, even if quite slowly.
Nevertheless, the quality check logic is incorrect, containing errors that can lead to unsafe vials being placed in the packaging line. Here are some feedbacks to improve the code:
Quality Check Logic
The main problem of your implementation concerns the logic of the quality check. Firstly, because the parameters you applied to the camera are not correct and lead the model to have a bad interpretation of the safety state. Indeed, the image you checked on the screen was not the one the modifications were applied to. Please review this image and apply the correct parameters to the camera, referring to the images the AI model was trained with. Optimizing the image to speed up the inference time is a good idea though.
Secondly, you decided to publish the safety state on a topic every 5 seconds. Because that's the median time to perform a trajectory in your operation, this is not a good idea. What if the image is not taken at the right time? Imagine a case where the image is taken without a vial — the last safety state would be randomly chosen.
To solve that, we recommend using a service to get the safety state. This service should be called each time the robot is in the test zone, and the safety state should be returned.
Besides, by watching the model you were given, one can clearly see that it has a lot of overfit, caused by the lack of diversity of the dataset it was trained on. This leads the model to perform correctly only if the data is taken under the same conditions as the dataset. Moreover, the model being a classification policy does not provide the possibility to detect if an object is in the image (i.e., the image will always return a safety check even if nothing is detected). In this case, it seems interesting to switch to a classification model that will return if a class is detected (here a vial) and its safety check. This will complement the service call, making sure an object is detected before returning something. You can publish the detection of an object using the quality_check/object_detected (std::bool) topic.
To solve problems coming from the model, we propose that you re-train a new YOLO model with the data of the laboratory.
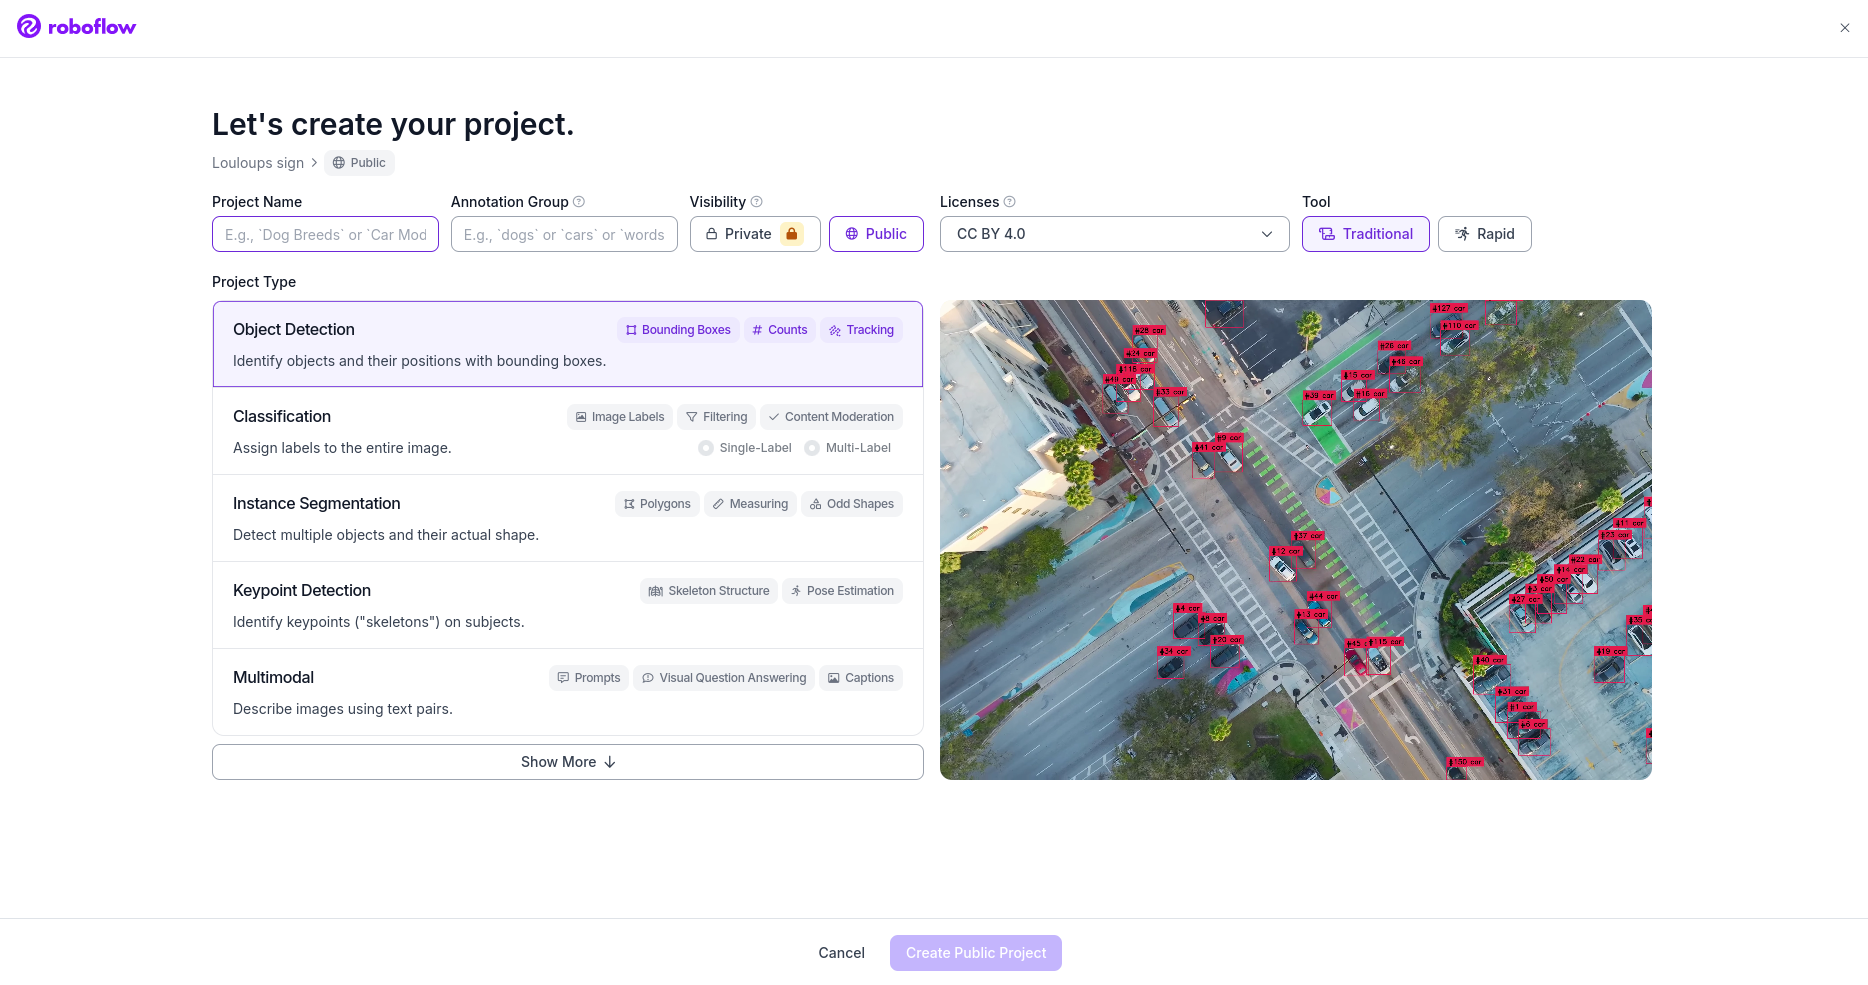
💡 Tip: To train a new AI vision-based model, we can fine-tune a YOLO model. To perform that, we recommend using Roboflow. Begin by creating an account. Click on "create new project" and you should land on this page:
Here select an "Object Detection" type model, which corresponds to a segmentation model. If you still want to use a classification model, select that type instead.
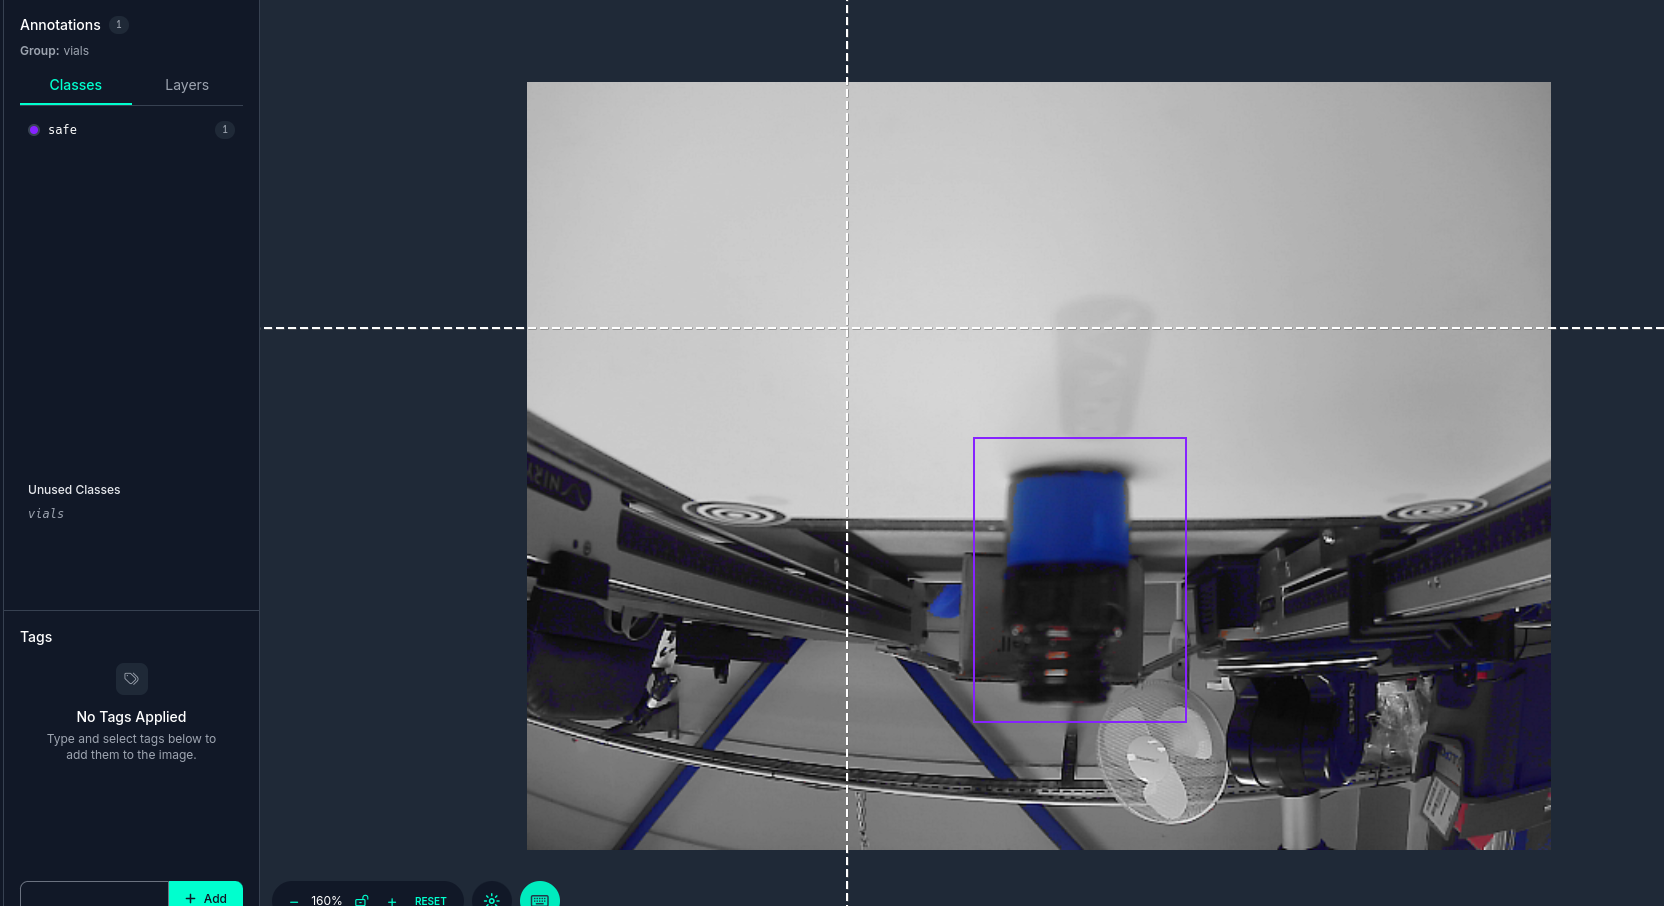
The next step is to take photos to construct your dataset. You will need ~50 photos per class (safe or unsafe) to construct a solid dataset. The main goal is to avoid overfit. As you can see, we provided tools to unmount the camera from its support; this is exactly what you will need to diversify your dataset. Unlike the one provided, you have to take photos in different positions and angles of the vials. To take 50 photos in a row using the same color filter, you can write a small Python script. For instance, the script
capture_img.pylocated in the assets folder takes 50 photos, one per second, with the correct colour filter if you run it with:python capture_img.py <name_of_the_class>Upload your directory on Roboflow, directly on the "Upload Data" section. Then go to annotate and start a batch. Annotate by drawing squares around the vials and naming them
safeorunsafe.
Add images of both red and blue vials to the dataset and then go to the "Versions" section. Give a name to this version, do not apply preprocessing steps, but you can augment your data by applying filters; this will allow your dataset to be bigger with only 50 "real" pictures.
Once your version is ready, click on download dataset and make sure you have
Yolo v8andShow download codeselected.
You should see some lines of Python code; now it is time for training! To train your own model, we recommend using this bject-detection-on-custom-dataset.ipynb" target="_blank" rel="noopener">Google Colab notebook.
Replace Step 5 with your code and execute the Colab. At the end, you will be able to perform the evaluation and validation of your model. Your model will be located at
/runs/detect/train/weights/best.pton Google Colab. Please download it, place it into the assets folder, correct the path, and adjust the code for segmentation in the detection node.Example code:
def _get_safety_prediction(self, filtered_image):
    """Use the YOLO segmentation model to predict and analyze safe/unsafe regions"""
    if self.model is None:
        self.get_logger().warn("Model not available, returning unsafe by default")
        return "unsafe"

    try:
        # Run the YOLO segmentation model
        results = self.model.predict(filtered_image, verbose=False)

        if not results or results[0].masks is None:
            self.get_logger().warn("No segmentation mask detected")
            return "unsafe"

        # Extract segmentation information
        boxes = results[0].boxes
        masks = results[0].masks
        names = self.model.names

        safe_detected = False
        unsafe_detected = False

        for i, box in enumerate(boxes):
            class_id = int(box.cls[0])
            label = names[class_id].lower()
            conf = float(box.conf[0])

            self.get_logger().info(f"Detected {label} (conf: {conf:.2f})")

            if label == "unsafe":
                unsafe_detected = True
            elif label == "safe":
                safe_detected = True

        # Decision logic — prioritize unsafe
        if unsafe_detected:
            return "unsafe"
        elif safe_detected:
            return "safe"
        else:
            return "unsafe"

    except Exception as e:
        self.get_logger().error(f"Error during segmentation prediction: {e}")
        return "unsafe"
Code Quality
The client requests are not fully fulfilled in terms of performance. The professors judge that the whole architecture of the project is not optimized. The conveyor belt belonging to the robot leads to the impossibility for it to run while the robot is performing the operation.
A way to solve the problem would be to consider the robot and the conveyor belt as two different entities, each one being its own node.
Here is a scheme of the suggested architecture:
Both the conveyor belt and the robot are now independently controlled with this architecture, each being its own node. Note that the IR sensor is now owned by the conveyor belt class as the IR sensor is located on the conveyor belt, even if plugged to the robot, as its message only sends data used to control the conveyor belt.
In ROS2, there is a way to ensure that both nodes are launched in parallel, using multithreading. Each node being executed in a separate thread, we can ensure that no blocking action will stop the other node from working.
To perform this, we can use ROS2 Executors, especially the MultiThreadedExecutor, which runs each node in a separate thread.
#!/usr/bin/env python3

import rclpy
from rclpy.node import Node
from rclpy.executors import MultiThreadedExecutor
import time

class Node1(Node):
    def __init__(self):
        super().__init__("node1")
        self.timer1 = self.create_timer(1.0, self.callback_timer1)

    def callback_timer1(self):
        time.sleep(2.0)
        self.get_logger().info("cb 1")

class Node2(Node):
    def __init__(self):
        super().__init__("node2")
        self.timer2 = self.create_timer(1.0, self.callback_timer2)

    def callback_timer2(self):
        time.sleep(2.0)
        self.get_logger().info("cb 2")

def main(args=None):
    rclpy.init(args=args)

    node1 = Node1()
    node2 = Node2()

    executor = MultiThreadedExecutor()
    executor.add_node(node1)
    executor.add_node(node2)

    try:
        executor.spin()
    finally:
        executor.shutdown()
        node1.destroy_node()
        node2.destroy_node()
        rclpy.shutdown()

if __name__ == "__main__":
    main()
These two basic nodes are now able to run in parallel, each one in its own thread.
Another important concept about MultiThreadedExecutor is that by default, the callbacks are executed separately and wait for each other. This is because a default callback is a Mutually Exclusive Callback Group, meaning that only one callback can be executed at a time. This is not the expected behavior for our application, as we want the conveyor and the robot to work in parallel. Declaring a ReentrantCallbackGroup will allow the callbacks to be executed in parallel. In a Reentrant Callback Group, the callbacks are executed each time the timer calls them, meaning they are not waiting for any other callback to be executed. Please consider building your new architecture with this concept in mind.
Note that the main challenge of transforming your code to this new architecture will be to avoid deadlocks. Deadlocks occur when two or more threads are waiting for each other to release a resource, causing a halt. It is very common in multi-threaded architectures, especially when creating action clients and service clients.
In the previous code, you used rclpy.spin_until_future_complete to wait for the future to be completed. This function is not thread-safe and will cause a deadlock. Indeed, the executor is already spinning, and calling this function will cause the executor to spin again, waiting for an answer that should come in the same thread, blocking itself.
One strategy to avoid this is to use the add_done_callback method of the future, adding a callback that will be executed when the future is completed. This callback should not be executed in the same thread as the one calling add_done_callback, avoiding deadlock and freeing the thread from the waiting loop.
future = self._robot.send_goal_async(goal)
# rclpy.spin_until_future_complete(self._node, future) will cause a deadlock
future.add_done_callback(lambda fut: self._on_result_response(fut))

def _on_result_response(self, future):
    result = future.result()
    self._node.get_logger().info("Entered the callback")
Note that the callbacks should communicate their state to the main thread using a shared variable to prevent the execution of multiple actions at the same time, now that the response is received in a different thread.
Logs
The HMI is supposed to display logs to the user. The demo version you downloaded asks you to implement new publishers and subscribers to implement new logs such as cadency, time to perform a trajectory, etc.
BONUS
Hey ! Pierre's talking, I just infiltrated Hansel's report ! I just wanted you to know that the other part of your team read Paul-Louis's report and got completely different feedbacks ! One told me that they still don't have MultiThreading, meaning that their conveyor is not working as fine as yours... Would you mind checking if you can implement this feature in their code ? I think it would be a great improvement for the project !