Presenter's guideline - WS2 : Conveyor & Sensor Integration
| Site: | NiryoAcademy |
| Course: | Robotics Outreach & Summer Camps: Guide |
| Book: | Presenter's guideline - WS2 : Conveyor & Sensor Integration |
| Printed by: | Guest user |
| Date: | Friday, 12 June 2026, 1:22 PM |
Description
🎯Expand the line by adding motion control and logic. Participants will integrate the conveyor and IR sensor so the robot can move objects automatically and react to sensor input.
⏱️2 hours
Table of contents
- Setup
- Step 1: Explain the Goal of the Workshop
- Step 2: Demonstrate the Conveyor
- Step 3: Demonstrate the IR Sensor
- Step 4: Open a New Blockly Program
- Step 5: Pick and Place from the Slope to the Conveyor
- Step 6: Start the Conveyor in Blockly
- Step 7: Test the Program So Far
- Step 8: Add IR Logic to Stop the Conveyor
- Step 9: Adjust for End Stopper Position
- Step 10: Pick and Place from Conveyor to Slope
- Step 11: Program Test
- Step 12: Loop the Program Indefinitely
Setup
We recommend using the recommended setup for the Workshop 2 and:
- Place the token on the sloped section of the conveyor belt. This will provide a consistent position for performing pick & place operations repeatedly.:
Step 1: Explain the Goal of the Workshop
Action:
-
Present the final task to participants.
Speaker notes:
“In this workshop, our goal is to make the robot pick an object from the slope, place it on the conveyor, activate the conveyor, wait for the IR sensor to detect the object, then pick the object again at the end stopper and place it back on the slope.”
“This will combine pick-and-place movements with conveyor control and basic sensor logic.”
Step 2: Demonstrate the Conveyor
Action:
-
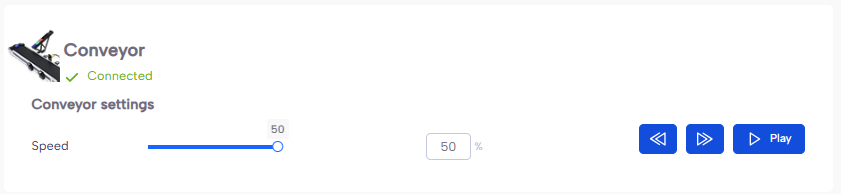
On the equipment tab of NiryoStudio, scan the tools and show how the conveyor works in forward, backward, and different speeds.
Speaker notes:
“Here is our conveyor. It can move forward or backward, and we can control its speed. Let’s see it in action.” (Show conveyor moving forward, then backward, then adjust speed.)
“This is important because we’ll be controlling the conveyor directly from our Blockly program.”
Step 3: Demonstrate the IR Sensor
Action:
-
Show the IR sensor setup on the conveyor.
-
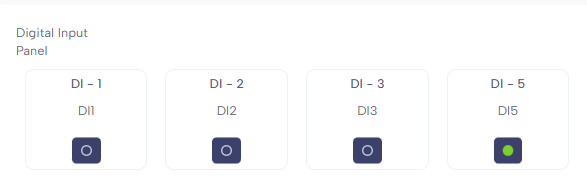
In NiryoStudio, open Inputs/Outputs and monitor DI5.
Speaker notes:
“This is the IR sensor. It detects when an object passes in front of it.”
(Show in the Inputs/Outputs tab) “Right now, DI5 is showing as HIGH. When I place an object in front of the sensor…” (Place object) “…you see that it changes to LOW.”
“So HIGH means no object detected, and LOW means an object is detected.”
Step 4: Open a New Blockly Program
Action:
-
In NiryoStudio, create a new Blockly program.
Speaker notes:
“Let’s start from scratch with a new program. First, we’ll create the pick-and-place from the slope to the conveyor.”
Step 5: Pick and Place from the Slope to the Conveyor
Action:
-
Move the robot using FreeMotion and save these positions in order:
-
Above the object at the bottom of the slope
-
On the object (grasp position)
-
Grasp action add the block manually
-
Copy/paste the above position from step 1 manually Ctrl +C , Ctrl + V
-
Intermediate high position between slope and conveyor (safe path)
-
Position above the start of the conveyor
-
Release action add the block manually
Speaker notes:
“First, I move above the object at the bottom of the slope and save the position. Then, I move down to the object, save again, and add a Grasp action to close the gripper.”
“I copy-paste the position above the object to lift the object safely, then take an intermediate position between the slope and the conveyor, high enough to avoid obstacles.”
“Finally, I move above the start of the conveyor and save this position.”
Step 6: Start the Conveyor in Blockly
Action:
-
Show the conveyor control blocks in Blockly.
-
Add a block to start the conveyor at the desired speed and direction.
-
Add a Scan & Update Tool and Scan Conveyor.
-
Add the Release block at the very top of the program.
Speaker notes:
“Here are the blocks that control the conveyor. We can set its speed and choose either forward or backward movement. For our task, we’ll set the conveyor to forward (or backward, depending on your setup) and use a moderate speed.”
“Let’s add this block right after we place the object on the conveyor.”
“To make sure the robot detects all the connected tools, like grippers and conveyors, we should always add the Scan & Update Tool and the Scan Conveyor blocks at the very beginning of the program.”
We didn’t do it in the first example because we performed a manual scan by pressing the Custom button to open the gripper, but it’s always better to add the block.
“ I also add a Release , like the previous pick and place -- this makes sure the gripper is open before we begin, preventing any surprises”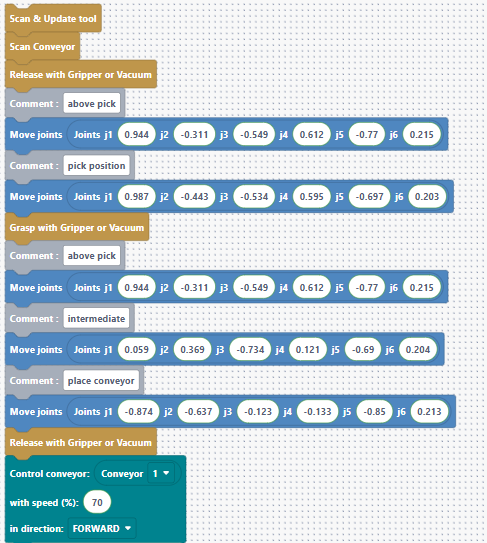
Step 7: Test the Program So Far
Action:
-
Run the program to verify the pick and place and conveyor start.
-
To stop the conveyor after the program , stop it from equipment tab
Speaker notes:
“Let’s run this first part to check everything works. The robot should pick the object from the slope, place it on the conveyor, and start the conveyor moving.”
Step 8: Add IR Logic to Stop the Conveyor
Action:
-
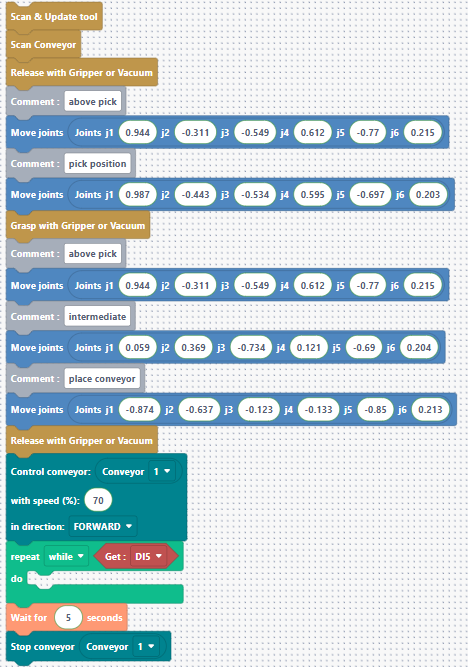
Add a While loop that runs the conveyor until the object is detected.
-
Condition: While DI5 is HIGH → keep conveyor on.
-
After loop: Stop conveyor.
Speaker notes:
“Now we add the logic to stop the conveyor when the IR sensor detects the object. Remember: DI5 is HIGH when no object is detected, and LOW when an object is detected.”
“So I’ll add a While DI5 is HIGH loop — this means the conveyor will keep running while no object is detected. As soon as DI5 changes to LOW, the loop ends and I immediately stop the conveyor.”
“Let’s run it and see — the object should stop just on the IR sensor.”
Step 9: Adjust for End Stopper Position
Action:
-
Show what happens if the object is allowed to roll to the end stopper.
-
Add a short delay after detection before stopping the conveyor.
Speaker notes:
“If we stop the conveyor exactly at detection, the object may not always be in the same exact position.”
“That’s why I’ll add a short delay after the sensor detects the object, so the object can reach the end stopper. This ensures we can pick it up properly.”
Step 10: Pick and Place from Conveyor to Slope
Action:
-
Record new positions:
-
Intermediate position collision safe
-
Above object at end stopper
-
On the object (grasp)
-
Grasp action
-
Above position again
-
Intermediate safe position
-
Above slope placement position (on top of the slope)
-
Release action
Speaker notes:
“Now we complete the program by picking the object from the end of the conveyor and placing it back on the slope, just like we did for the first pick.”
“Please note that it is always important to use intermediate positions to avoid collisions with other equipment.”
“We save the positions, add the Grasp and Release actions, and that’s it — our full loop is complete.”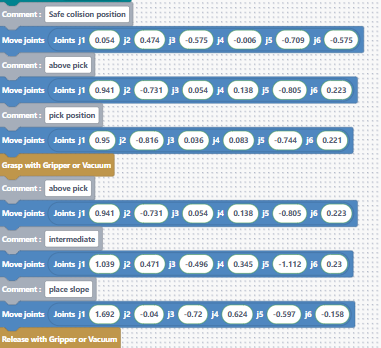
Step 11: Program Test
Action:
-
Run the full program.
Speaker notes:
“Let’s run the full program. The robot should pick from the slope, place on the conveyor, the conveyor will stop when the IR sensor detects the object, then the robot will pick from the conveyor and place back on the slope.”
Step 12: Loop the Program Indefinitely
Action:
-
In Blockly, wrap all the existing program code inside a While “True” loop.
-
Add a Safe collision position at the beginning of the loop
Speaker notes:
“Now we want our sequence to repeat forever. To do this, I’ll put all the code we’ve just created inside a While ‘True’ loop.”
“This means the program will never stop on its own — it will keep repeating the pick, conveyor, and place cycle until we manually stop it.”
“However, we want to make sure the robot always starts its cycle from a safe position.”
“Let’s see it in action now.”
