Presenter's guideline - WS3 : Final Quality Check with Vision
| Site: | NiryoAcademy |
| Course: | Robotics Outreach & Summer Camps: Guide |
| Book: | Presenter's guideline - WS3 : Final Quality Check with Vision |
| Printed by: | Guest user |
| Date: | Friday, 12 June 2026, 2:33 PM |
Description
🎯Simulate a real-world quality control station. Participants will use the robot’s vision system to sort objects by color and shape as they arrive on the conveyor.
⏱️2 hours
Table of contents
- Setup
- Step 1: Explain the Goal of the Workshop
- Step 2: Demonstrate Vision Parameters
- Step 3: Open a New Blockly Program
- Step 4: Load and Adjust the Vision Pick Template
- Step 5: Explain Vision Pick Parameters
- Step 6: Move to Trash Area (Beta Zone)
- Step 7: Test with Two Objects
- Step 8: Add Else If for Squares
- Step 9: Add Else If for Circles
- Step 10: Test with Three Objects
- Step 11: Add Conveyor Logic (From Workshop 2)
- Step 12: Loop the Entire Process
- Troubleshooting and Discussion
Setup
We recommend using the recommended setup for the Workshop 3:
-
You may remove the slope for this workshop, as it will interfere with placing tokens in the beta zone.
-
If you are using the program provided by Niryo, pay attention to the “vision pick” blocks, as the workspaces are not pre-selected.
-
Before running the final program, place all tokens at the beginning of the conveyor belt, leaving a small gap between each one rather than stacking them together.
Step 1: Explain the Goal of the Workshop
Action:
-
Describe the task to participants.
Speaker notes:
“In this workshop, we’re going to replicate a Final Quality Check process. Objects will arrive on the conveyor and, once they enter the vision workspace, the robot will use its camera to decide where to place them based on their color and shape.”
“Here’s the logic:
-
If the object is red → it goes to the trash area (Beta zone of the bundle).
-
If it’s not red and a square → it goes to the storing zone (Alpha zone).
-
If it’s not red and a circle → it goes to the shipping zone (vision plate).”
Step 2: Demonstrate Vision Parameters
Action:
-
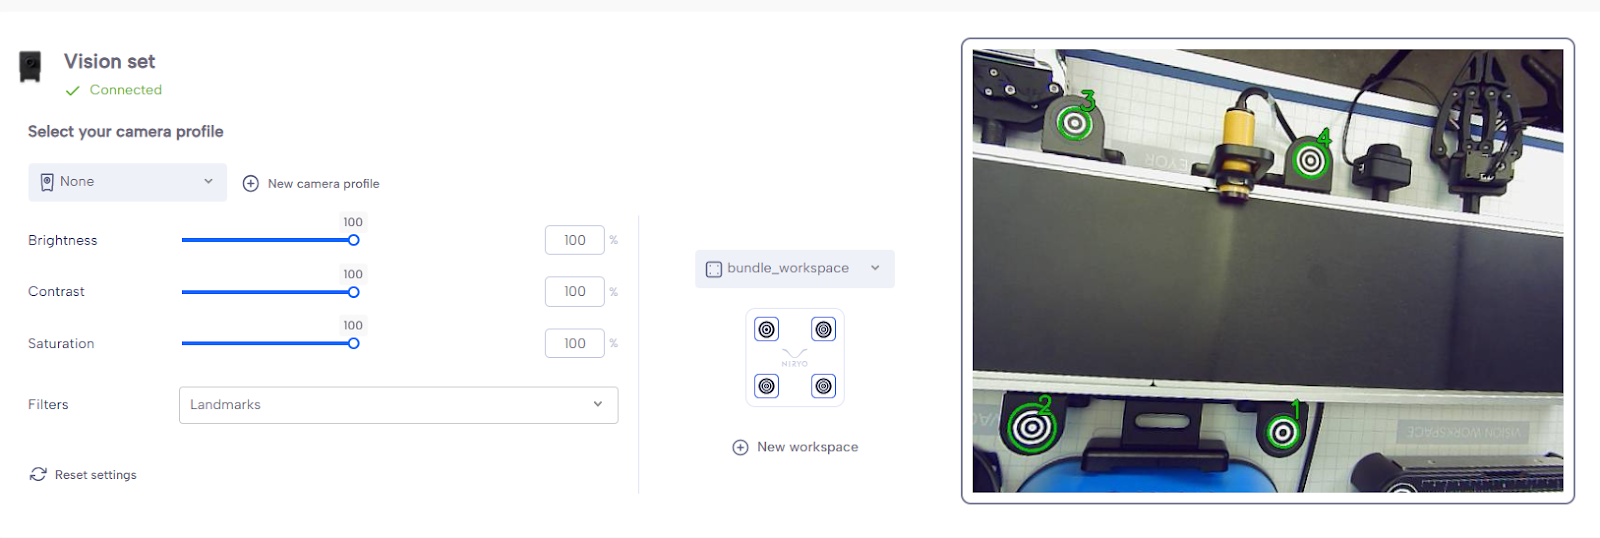
On the equipment tab of Niryotudio, show the vision workspace with the camera.
-
Place 3 objects of different colors on it.
-
Adjust Brightness, Contrast, and Saturation.
-
Try the different filters.
Speaker notes:
“Let’s start by looking at the vision system. I’ll place three different objects here so we can see how the camera picks them up.”
“We can adjust Brightness, Contrast, and Saturation to make the detection more reliable depending on the lighting conditions.”
“Here are the filters — they help refine object detection by focusing on specific characteristics.”
Step 3: Open a New Blockly Program
Action:
-
Create a new Blockly program.
-
Add Scan & Update Tool block at the very top.
Speaker notes:
“We’ll start fresh with a new Blockly program. The first thing I add is the Scan & Update Tool block. This ensures the robot scans all connected tools before running — and since the camera is considered a tool, this prevents detection errors.”
Step 4: Load and Adjust the Vision Pick Template
Action:
-
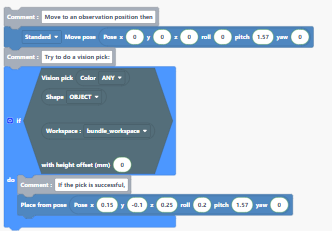
Load the Vision Pick template.
-
Move the robot to a good observation pose above the conveyor workspace so all 4 workspace landmarks are visible.
In the program you can download: the workspace is not defined in the block → you need to add the conveyor workspace you set up before the workshop.
-
Save this position and replace the template’s default position with yours.
Speaker notes:
“We’ll use the vision pick template to speed things up. I move the robot above the conveyor workspace so the camera can see all four landmarks — this is essential because the vision algorithm needs these reference points to calculate object positions accurately.”
“I’ll save this as our observation pose and replace the one in the template.”
Step 5: Explain Vision Pick Parameters
Action:
-
Show the settings for Color, Shape, Workspace, and Offset.
-
Set Color = Red, Shape = Any, Height Offset = 10 mm. (Offset 10mm if using vacuum pump)
Speaker notes:
“The vision pick lets us choose which objects to pick based on color and shape, and tells the robot which workspace to use.”
“The height offset is important when using tools like the vacuum pump — it prevents the robot from crashing into the object by setting the correct approach height.”
“We’ll start by detecting red objects of any shape. Since our objects are 10 mm high, I’ll set the offset to 10 mm.”
Step 6: Move to Trash Area (Beta Zone)
Action:
-
Add intermediate position between conveyor workspace and trash area.
-
Move above trash area, save position, and add a Release action.
-
Replace the “place from pose” bloc in the template with the 2 new positions.
-
Add a release with gripper or Vacuum after the 2 positions.
Speaker notes:
“If the robot finds a red object, it will pick it and place it in the trash area, which is the Beta zone. I add an intermediate position for safe travel, then move above the Beta zone and add a release action.”
Step 7: Test with Two Objects
Action:
-
Place one red object and one green object on the workspace.
-
Run the program.
Speaker notes:
“Let’s test the program. The robot should detect the red object, pick it, and place it in the trash area. If it doesn’t find a red object, it will do nothing — we’ll add the rest of the logic next.”
Step 8: Add Else If for Squares
Action:
-
Click the gear icon on the If block to add an Else If. (Drag and drop the else if below the if)
-
Copy and paste the Vision Pick condition block in the new if.
-
Change Color = Any and Shape = Square.
-
Add intermediate position and place position above the storing zone (Alpha zone).
Speaker notes:
“Now we add a second condition: if the object isn’t red, but it’s a square, it should go to the Alpha zone, which is our storing zone.”
Step 9: Add Else If for Circles
Action:
-
Add another Else If block.
-
Copy and paste the Vision Pick block again.
-
Change Color = Any and Shape = Circle.
-
Add intermediate position and place position above the shipping area (vision plate).
Speaker notes:
“Our third condition: if the object isn’t red or a square, but is a circle, we’ll send it to the shipping area, which is our vision plate.”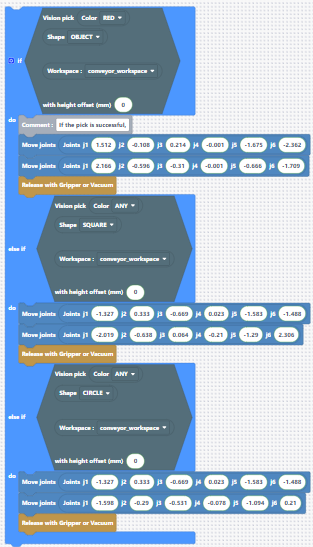
Step 10: Test with Three Objects
Action:
-
Place a red object, a blue circle, and a blue square on the workspace.
-
Run the program three times.
Speaker notes:
“Let’s see the complete logic in action. The robot will first check for red objects, then for any color squares, and finally for any color circles.”
Step 11: Add Conveyor Logic (From Workshop 2)
Action:
-
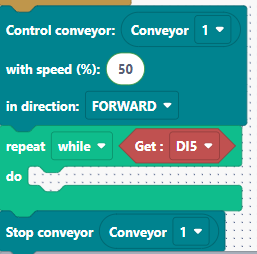
Add a While loop to run the conveyor until the IR module detects an object.
-
Condition: While DI5 is HIGH → keep conveyor on at 50% speed.
-
After loop: Stop conveyor.
-
Place the Vision Pick logic after the conveyor stop.
Speaker notes:
“Now we integrate the conveyor logic we used in Workshop 2. The conveyor runs until the IR sensor detects an object — DI5 goes LOW when something is detected. Once detected, we stop the conveyor and run the vision pick logic.”
Step 12: Loop the Entire Process
Action:
-
Wrap the conveyor logic and vision logic inside a While True loop.
Speaker notes:
“Finally, I’ll put everything inside a While True loop so the quality check runs continuously. The robot will keep picking and sorting objects until we stop the program manually.”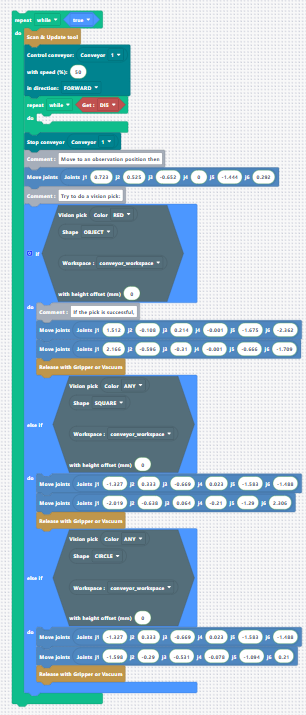
Troubleshooting and Discussion
Troubleshooting:
-
If the robot crashes into the object:
Make sure the TCP (Tool Center Point) of the robot is activated when using vision. This ensures the robot accounts for the height and geometry of the tool it’s using.
-
If the vision does not work properly (e.g., picking the wrong object or not detecting), check the filter settings and adjust them to see if this improves the results.
Discussion:
-
When multiple objects are stacked or arrive close together, the current code may have limitations. The delay between the IR sensor detecting an object and the conveyor stopping can sometimes let extra objects pass.
-
One improvement would be to first check if an object is detected; if not, run the conveyor.
-
Another approach is to use vision-based detection instead of relying solely on the IR sensor: if the vision detects an object in the workspace, the robot picks it; if the workspace is empty, the conveyor runs.