Step 1: Setup the python virtual environment
The first step we need to follow is to create a Virtual Environment in Python on the remote computer we want to use to run the AI model (Indeed due to the lack of resources on the Ned Robots, it is recommended to run the AI computation through an external computer). This can be done through an IDE. In my case, I will use PyCharm, but feel free to use any method of your choice to build your virtual environment.
Now open a terminal, it should look like this
Now that we have a Virtual environment, we have to install some libraries that will allows us to perform the lesson. You can install it with the pip tool (pip install –your package–). For this lesson we need :
- opencv-python The OpenCV package that provides function to do basic Com- puter Vision operations such as display, analyse and resize the images recieved from the robot.
- ultralytics. This library provides tools for the YOLO model deployment.
- math. Obviously useful for basic computation
- pyniryo. The official Niryo Pyhton Library that allows us to communicate with the robot.
If everything went well you should be able to run this code on python :
import cv2
import math
from ultralytics import YOLO
from pyniryo import *
At this point, we will need the physical Niryo Robot ready and connected to the internet. Make sure you followed every step of the installation notice of your Niryo Robot before continuing the lesson.
Note that this tutorial is also realizable with a simulated robot on Gazebo with a ROS camera.
Step 2: Communicate with the Niryo Robot
Start your robot and connect it to the internet. On the connect section of the Niryo Studio software, you should see your robot appearing. Click connect and copy its IP address.
Here is an example with my robot :
The IP address of my robot is thus 192.168.1.185. After we copied it, we can close Niyro Studio.
The next step consist in connecting our robot to our external computer through our python file. Running the following code after the previous import should connect our computer to the robot and display the camera’s frames from the Vision Kit. Before running the code please check that the camera is connected to one of the USB ports of the robot
robot_ip_address = "insert your robot address"
robot = NiryoRobot(robot_ip_address)
robot.calibrate_auto()
robot.update_tool()

while True:
    img_compressed = robot.get_img_compressed()
    img = uncompress_image(img_compressed)
    cv2.imshow('Vision Kit', img)
    if cv2.waitKey(1) == ord('q'):
        break

cv2.destroyAllWindows()
robot.close_connection()
Code breakout : We firstly define the Ip address of our robot, so that Python can know to which robot it has to connect. We create an instance of the class NiryoRobot called robot. If needed a calibration and a tool update are performed. Then we enter a loop, inside we collect the compressed version of the image captured by the vision kit, we uncompress it locally on the computer and then display every frame on the computer screen via the OpenCV library. An if condition is added to make the loop excitable, pressing q on our keyboard allows us to quit the program.
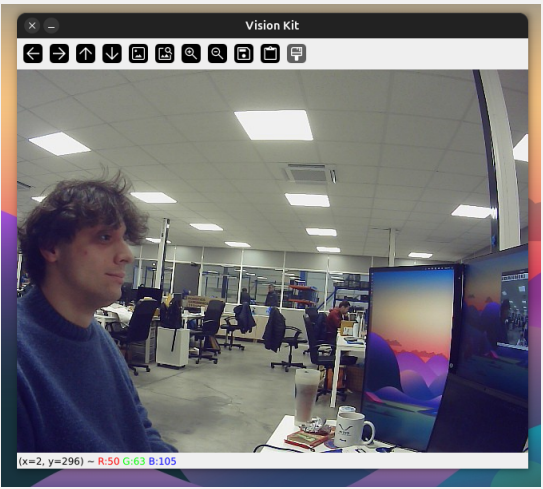
If everything went well, by running the program you should see the video flux of your vision Kit. Here an example of how it should look
For the next part of the lesson we will need additional stuff, personal objects, whatever you want the robot to be able to recognize. For better results, it is recommended to use objects with various shapes and colors.
Step 3: Build your dataset
At this point professor Pierre thinks that is it time for a little bit of theory. Indeed we are about to train our first AI Model, but how do we perform that ? We first have to know that an AI model is basically a neural network, that means cells that computes mathematical operations from multiples inputs to a fixed number of outputs. In our case the inputs will be the image received from the camera, and an arry of strings containing the name of the possible objects to recognize. The output is unique and it’s a dictionary containing the name of a detected object, its position on the image and the size of its bounding box.
To optimize the mathematical operations performed inside the neural network, we have to perform a Training phase. The method we will use to train our model is called Supervised Learning, this method consist in constructing a Dataset (i.e a collection of imputs) (In our case, a directory of images of the selected objects) and giving the excepted output for each file of the dataset to explain to the model how it should behave. Here are the steps to follow to build your dataset :
- Choose your objects, in my case I will only chose 2 objects, but the number can be infinite. I will try to make the robot able to recognize 2 different Ned TCP, a gripper and an 3D Axis displayer.
- Take pictures of your objects. This is the fun part, you can chose any method to take pictures of your objects : from your phone, the robot camera, an online image bank if it’s a common object... In my case, I will take pictures from my phone and transfer it to a folder in my computer. It is recommended to have the pictures in a jpeg or png format. In the case that you have an iPhone, and thus, .HEIC images in your folder, i got you, just run this command at the directory containing your pictures :
sudo apt-get install libheif-examples
for i in *.HEIC; do heif-convert "$i" "${i%.*}.jpg"; done
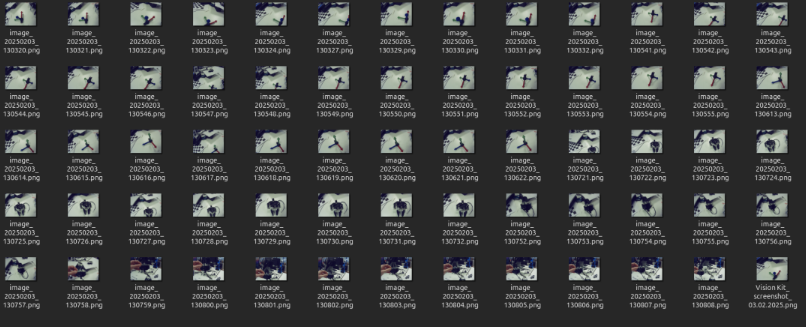
I would personally recommend to take at least 30 photos of every object you chose. At the end your directory should look like this :
Furthermore, this can be an example of the photo we took for our dataset :
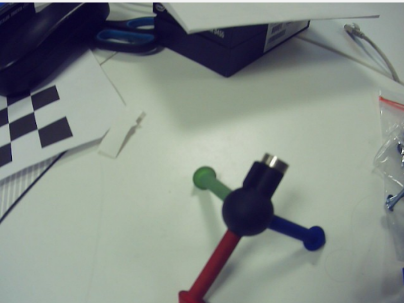
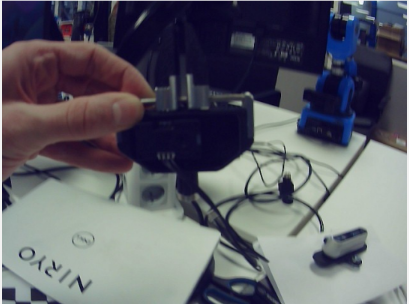
As you can see, the photos don’t need to be as clean as possible, the poses can be diverse and the exposure too.
For the following steps we will use the external tool called Roboflow, it’s an online dataset manager that is free to use as far as you accept to create an account. To follow the lesson, please sing up to this website.
Step 4: Label your dataset
- On Roboflow, create a new project with the Object Detection Type. Assign a name to your workflow and call your annotation group Objects. You should arrive in the Upload Data section. Here you can upload all the photos you took of your objects. Press save and continue, the upload will begin.
- The Annotate section should now contain your images, click on Annotate images and then Start Manual labeling. You should arrive to this interface :
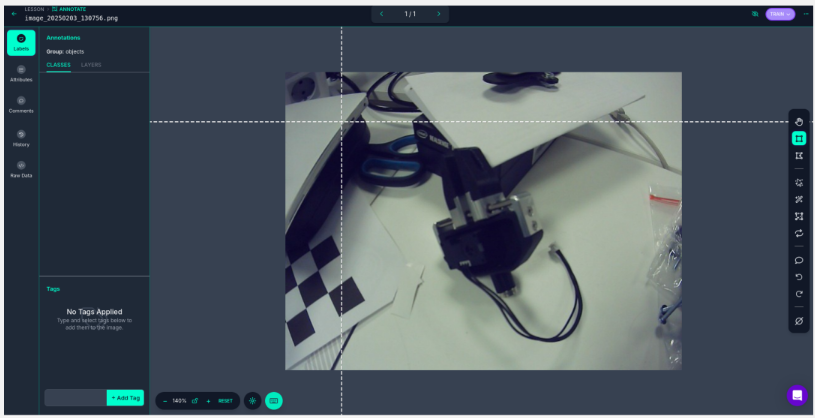
With your mouse, draw a square around your object, and add its name. Congratulation, you just created your first Class (i.e. a type of object to recognize). Repeat the operation labeling all your images and creating new classes for each new type of object until you finished building your dataset.
Once you finished annotating, click on add images to dataset, and choose the Split Images method with values 50-25-25
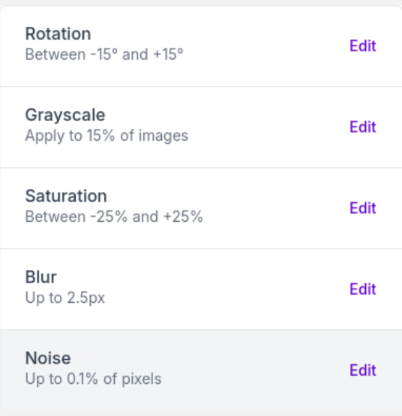
- On the Dataset section you should now see your annotated images. Click on Create new version and keep the values on default except on the step 4 where you can play with data augmentation using the parameters of your choice. This choice depends on your dataset, for instance, is it not recommended to use the Black and White transfor- mation is your goal is to detect square with different colors...
For my application i chose the following parameters :
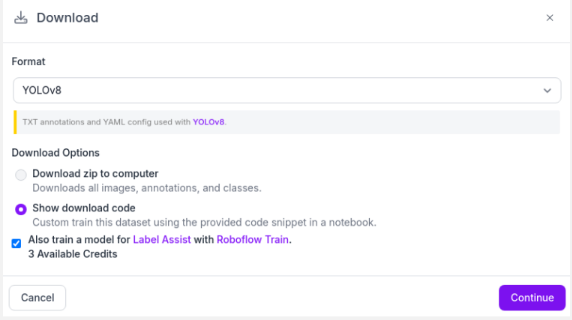
- Once you created a version go on the Version tab. Click on the download dataset button and configure it this way :
To perform the next step of the lesson, you will need to access the Pierre’s AI Training GoogleColab. Make sure it is connected to a GPU runtime, unless it will not work.
Step 5: Train your model
As previously said, we will train our model using the Supervised Learning Method from a pre-trained object detection model called YOLO v8. To perform that, follow the steps described in my Jupyter notebook.
Code breakout: We firstly install the YOLO and NVIDIA dependencies to setup a training environment. Then we clone our dataset from Roboflow with our API key. For this step make sure that you replaced this part of code with the one you obtained in Step 4. We then run the Training phase (note that this step could take a while). At the end you should obtain what we call a Confusion Matrix that shows you how many objects were correctly identified or not. This is an indicator of the precision of your model. If your model seems unprecise at this point, you can think in upgrading your dataset with new images, or review your annotations.
For instance, my confusion matrix looks like this :
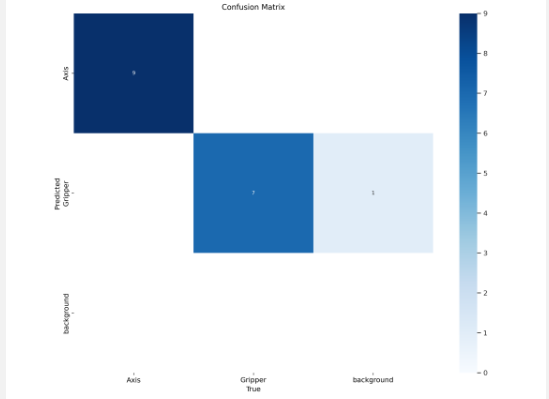
Having most of our results in the diagonal means having a low error, in my case, only one image was incorrectly detected.
Now that our training phase is finished, on Colab go to runs/detect/train/weights and download the best.pt file. This is your neural network.
Step 6: Deploy the model to the robot
- Once you’ve downloaded your weights, move the file into your python virtual environment. It is now time to deploy your model to detect the objects on the images provided by the robot.
- Before the while loop, define your model and the classes you had in your dataset. In my case, I added this code:
model = YOLO("best.pt")
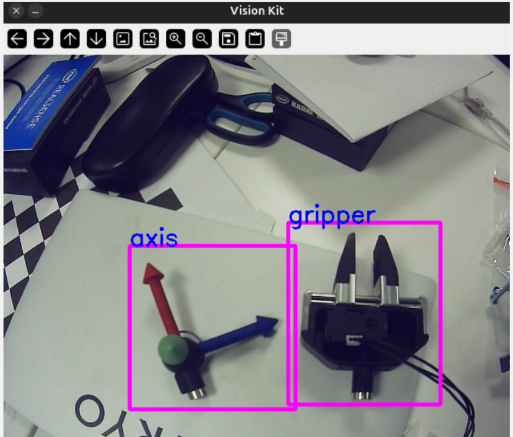
classNames = ["axis", "gripper"]
Replace the name of the classes with the one you had in Roboflow. It is not necessary to have the exact same, just declare them in the same order as online.
Replace the while loop we designed before with this one:
while True:
    img_compressed = robot.get_img_compressed()
    img = uncompress_image(img_compressed)
    results = model(img, stream=True)
    for r in results:
        boxes = r.boxes
        for box in boxes:
            x1, y1, x2, y2 = box.xyxy[0]
            x1, y1, x2, y2 = int(x1), int(y1), int(x2), int(y2)
            cv2.rectangle(img, (x1, y1), (x2, y2), (255, 0, 255), 3)
            confidence = math.ceil((box.conf[0] * 100)) / 100
            print("Confidence --->", confidence)
            cls = int(box.cls[0])
            print("Class name -->", classNames[cls])
            org = [x1, y1]
            font = cv2.FONT_HERSHEY_SIMPLEX
            fontScale = 1
            color = (255, 0, 0)
            thickness = 2
            cv2.putText(img, classNames[cls], org, font, fontScale, color, thickness)

    cv2.imshow('Vision Kit', img)

    if cv2.waitKey(1) == ord('q'):
        break
At this point, the lesson is finished. The last thing you have to do is to test your model in real time on the robot. The Vision Kit window should now display the name of the objects you defined! Example:
If it works well with your model: Congratulations! You just made your first AI model.
If it still struggles to detect objects: I would recommend adding more pictures to your dataset. 30 photos per object is very low; professional datasets usually contain more than 100,000 photos!