Calibration of the Niryo Robot via TIA PORTAL
Author: Jerome Hugel , INSA Strasbourg
Preamble
This tutorial establishes the connection between a PLC and the Niryo Ned2 robot to perform a calibration.
The robot software version used is 5.6.2-b04, which can be viewed on NiryoStudio.


Tutorial
Start by creating a new project in TIA PORTAL.

Enter the project name and path.
Click on Create

Click on Open project view.
This leads to the following interface.
We need to add the PLC as well as the input and output modules.
Click on Add device.

The following window appears.

Select the reference of your PLC from Controllers.
In our case: SIMATIC ET200 CPU → CPU 1512SP F-1 PN → 6ES7 512-1SK01-0AB0.
Click OK.
The following interface appears.

Next, add the input and output modules: DI = inputs and DQ = outputs.
Click on the modules in Options on the right side of the interface.

Drag each module to the middle interface (right of the PLC).

In Server Modules, select the server module and drag it to the right of the input and output modules.

Next, configure the added elements. Start with the PLC.
Click on the PLC, then go to Properties → General → PROFINET Interface → Ethernet Address.
Enter the PLC's IP address as shown in the following figure.

Click on Protection & Security.

Check all the boxes as indicated in the image above.
Click on System and Clock Memories.

Check the two boxes as in the image above.
Click on General → Fail-safe → F-activation.

Uncheck the box as shown in the above figure.
Select the input module.
Click on General → Potential Group.

Check the box as in the image above.
Do the same for the output module.

Check the box as in the image above.
Then, proceed to load the program into the PLC.
Start with hardware compilation:
PLC_1 (right-click) → Compile → Hardware (complete compilation).

Then, compile the software:
PLC_1 (right-click) → Compile → Software (complete compilation).

Next, proceed with loading:
PLC_1 (right-click) → Load into device → Hardware configuration.

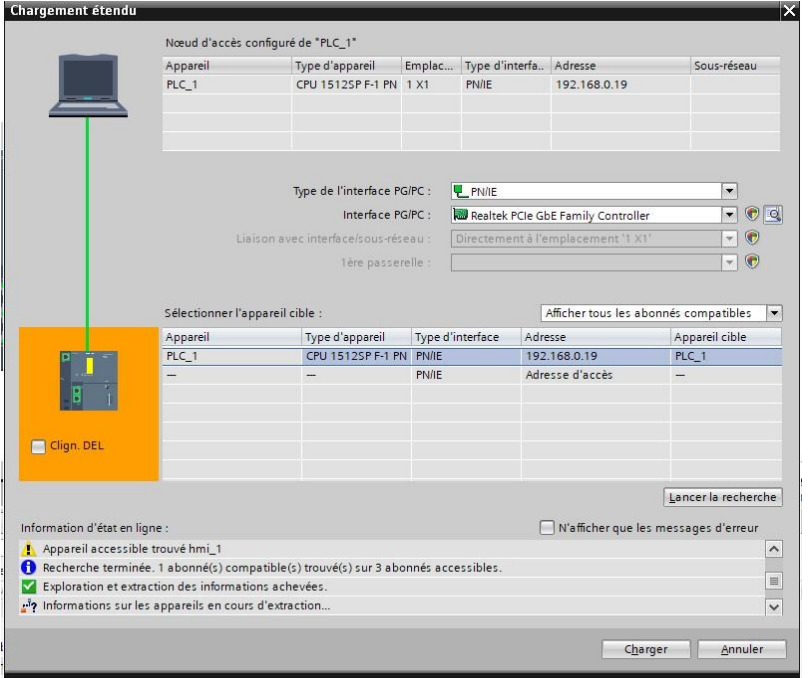
An interface like the one below appears:

Click Start search.

Select the PLC used. Make it blink to ensure it's the correct one. Then
click Load.
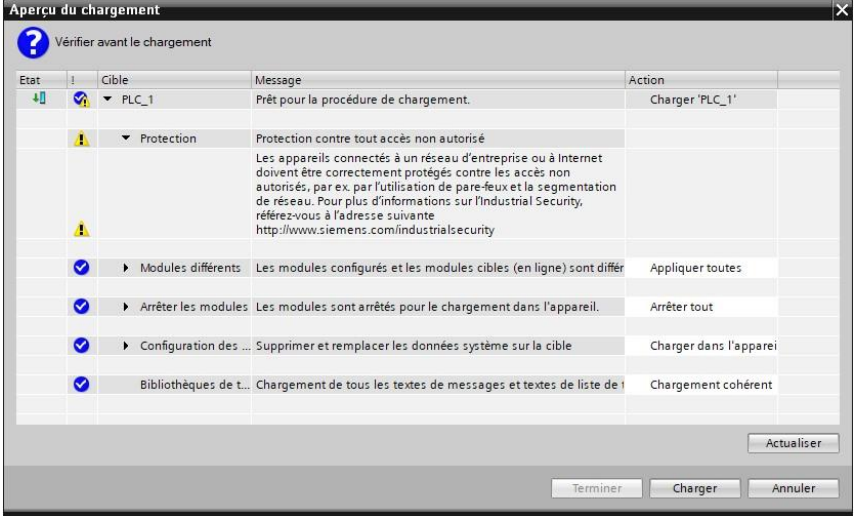
The following window opens:

Select the actions as shown in the above image.
Click Load
Congratulations, the robot is now calibrated!


