About the course
Scenario
The student discovers how to connect and communicate simple instructions between an Arduino and the Ned2’s Raspberry Pi. In this exercise, the Ned2 robotic arm, depending on the word said by the operator, brings bins with parts within the operator’s reach. The Robotic Arm is programmed with Blockly and the Arduino is programmed in C++.
This exercise simulates the interaction of an assembly line operator with a cobot to optimize “TAKT TIME”.
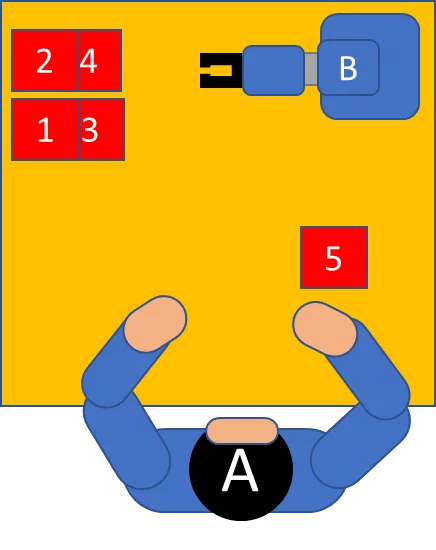
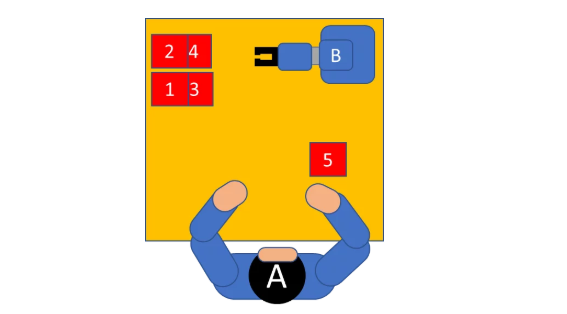
The operator (A) works on an assembly line that produces small household appliances. This operator is at the end of the line and tests the finished products. On the product, 4 elements may have a defect. If the operator detects a problem, they asks the robotic arm to provide them with a component to replace the defective element.
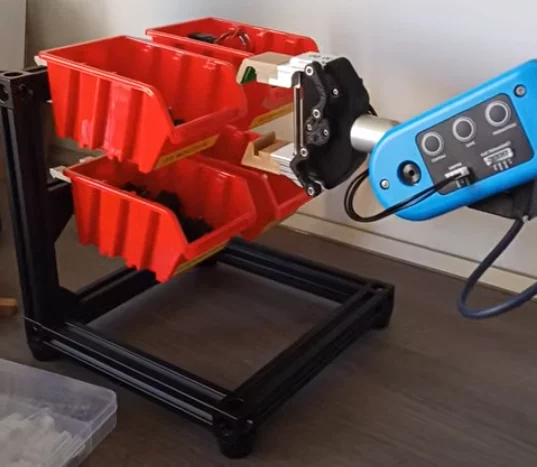
The 4 elements that can be replaced are in containers in positions 1, 2, 3 and 4. When the operator names a defective component (for example: Button, Fan, Switch, Cable) the NED2 robotic arm (B) takes the container with the requested component and positions it for 5 seconds in position 5 so that the operator can take the necessary part.
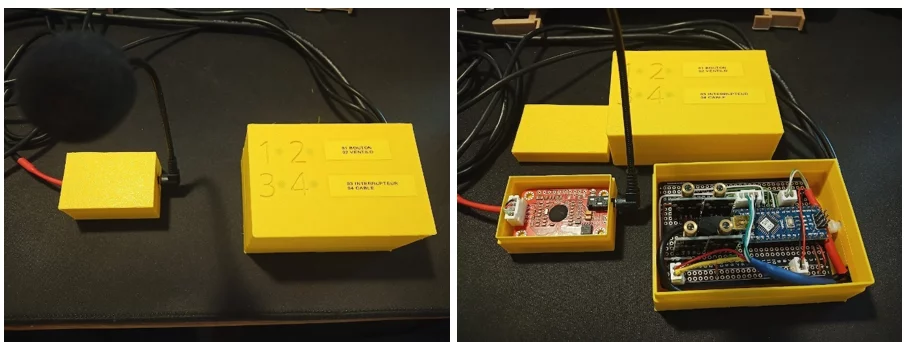
The voice recognition module is connected to an Arduino Nano and the Arduino Nano is connected to the digital pins on the rear panel of the Ned2 robotic arm.
The voice recognition module must be trained with the operator’s voice. To do this, using the microphone, the training program supplied with the Elechouse v3 module driver asks the operator to say each word to identify a bin several times.
Laboratory Content
Chapter 1: Discovering Blockly
- Blockly Overview
Chapter 2: Creating the voice recognition module
- Create an accessory for the NED2 Robotic Arm capable of giving orders to the NED2 Robotic Arm using an Arduino microcontroller and ELECHOUSE v3 voice recognition module.
Chapter 3: Creating movement sequences for the NED2 robotic arm
- Perform a Pick and Place sequence
Required equipment
 Ned2
Ned2
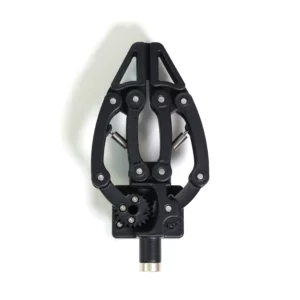 Adaptive gripper
![]() NiryoStudio
NiryoStudio
![]() Arduino Nano
Arduino Nano
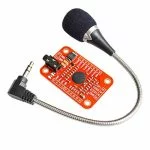 ELECHOUSE v3
Prerequisite knowledge
- The installation of the Arduino programming environment, as well as the uploading of the Arduino program is not explained in this document.
- It is strongly recommended to complete the Getting started with Blockly lab and the Ned2 control lab with Arduino box before completing this lab if you are not used to using Blockly.
Setup
- Place the Ned2 robotic arm on a table.
- The Ned2 robotic arm must have an obstacle-free perimeter of approximately 60 centimeters in radius.
- Connect the Ned2 robotic arm to the NED2 robotic arm safety box
- Connect the safety box of the NED2 robotic arm to the power supply of the NED2 robotic arm
- Connect the power supply of the NED2 robotic arm to the electrical network
- Connect the Ned2 robotic arm to NiryoStudio
- Connect the Arduino box to the Ned2 robotic arm (Once the box is mounted)
Course content
About the Author

Enrolment options
Voice control of the Ned2 with Arduino
- Length: 4h
- Content Type: Lab
- Programming: Arduino
- Equipment: Bundle STEM
Scenario
The student discovers how to connect and communicate simple instructions between an Arduino and the Ned2’s Raspberry Pi. In this exercise, the Ned2 robotic arm, depending on the word said by the operator, brings bins with parts within the operator’s reach. The Robotic Arm is programmed with Blockly and the Arduino is programmed in C++.
This exercise simulates the interaction of an assembly line operator with a cobot to optimize “TAKT TIME”.
The operator (A) works on an assembly line that produces small household appliances. This operator is at the end of the line and tests the finished products. On the product, 4 elements may have a defect. If the operator detects a problem, they asks the robotic arm to provide them with a component to replace the defective element.
The 4 elements that can be replaced are in containers in positions 1, 2, 3 and 4. When the operator names a defective component (for example: Button, Fan, Switch, Cable) the NED2 robotic arm (B) takes the container with the requested component and positions it for 5 seconds in position 5 so that the operator can take the necessary part.
The voice recognition module is connected to an Arduino Nano and the Arduino Nano is connected to the digital pins on the rear panel of the Ned2 robotic arm.
The voice recognition module must be trained with the operator’s voice. To do this, using the microphone, the training program supplied with the Elechouse v3 module driver asks the operator to say each word to identify a bin several times.
Laboratory Content
Chapter 1: Discovering Blockly
- Blockly Overview
Chapter 2: Creating the voice recognition module
- Create an accessory for the NED2 Robotic Arm capable of giving orders to the NED2 Robotic Arm using an Arduino microcontroller and ELECHOUSE v3 voice recognition module.
Chapter 3: Creating movement sequences for the NED2 robotic arm
- Perform a Pick and Place sequence
Required equipment
Ned2
Adaptive gripper
![]() NiryoStudio
NiryoStudio
![]() Arduino Nano
Arduino Nano
ELECHOUSE v3
Prerequisite knowledge
- The installation of the Arduino programming environment, as well as the uploading of the Arduino program is not explained in this document.
- It is strongly recommended to complete the Getting started with Blockly lab and the Ned2 control lab with Arduino box before completing this lab if you are not used to using Blockly.
Setup
- Place the Ned2 robotic arm on a table.
- The Ned2 robotic arm must have an obstacle-free perimeter of approximately 60 centimeters in radius.
- Connect the Ned2 robotic arm to the NED2 robotic arm safety box
- Connect the safety box of the NED2 robotic arm to the power supply of the NED2 robotic arm
- Connect the power supply of the NED2 robotic arm to the electrical network
- Connect the Ned2 robotic arm to NiryoStudio
- Connect the Arduino box to the Ned2 robotic arm (Once the box is mounted)
- Enrolled students: 25
- Length: 4h
- Content Type: Lab
- Programming: Arduino
- Equipment: Bundle STEM
This course includes
Resources