About the course
Scenario
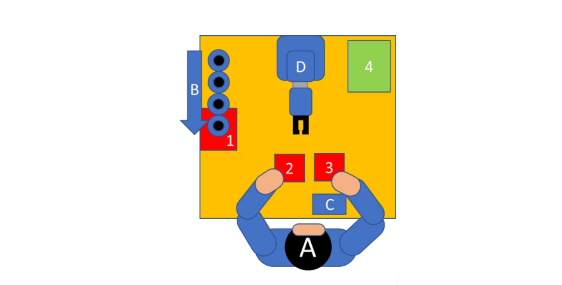
The student discovers how to connect and communicate simple instructions between an Arduino and Ned’s Raspberry Pi. In this exercise, the Ned2 robotic arm receives instructions from an Arduino to either bring vials back to an operator, or to take vials from in front of the operator, shake them, and place them in a box. The Robotic Arm is programmed with Blockly and the Arduino is programmed in C++.

The operator must fill vials, mix the contents in the vial by shaking it and then place the vials in a cardboard box.
A: Operator of an assembly line,
B: Vial conveyor
C: NED2 robotic arm control box
D: NED2 robotic arm
1: Bottle holding area
2: Bottle placement area
3: Bottle holding and shaking area
4: Placement area for the stirred bottle (cardboard box)
If the operator touches button 1 of the control box, the robotic arm takes vials from zone 1 and places them in zone 2 until the operator touches button R.
If the operator touches button 2 of the control box, the robotic arm takes bottles from zone 3 and shakes them and places them in zone 4 until the operator touches button R.
If the operator touches the R button immediately after touching button 1 or button 2, the NED2 robotic arm only performs the chosen operation once.
Laboratory Content
Chapter 1: Discovering Blockly
Getting started with Blockly
Chapter 2: Creation of the NED2 robotic arm control box
Assemble a control box which will give orders to the NED2 Robotic Arm using an Arduino microcontroller and 3 capacitive buttons.
Chapter 3: Creating movement sequences for the NED2 robotic arm
Create a movement sequence in Blockly
Create the code interface between the Arduino block and the Ned2.
Required equipment
 Ned 2
Ned 2
 Adaptative gripper (or other)
![]() NiryoStudio
NiryoStudio![]() Control box (to assemble)
Control box (to assemble)![]() Arduino Nano
Arduino Nano
Control box (to be assembled)
Arduino nano
Arduino Nano
Control box
Arduino Nano (the same code can be used on Arduino UNO or MEGA)
400 point prototype board (30 rows)
Piezo Buzzer
Green LED
Red LED
Two 220k resistors
3 TTP223B capacitive sensors
Male-male and male-female cables
3D printed case (Optional, model downloadable from docs.niryo.com)
Prerequisite knowledge
Basics of building electronic circuits.
The Arduino programming environment, as well as uploading programs to the Arduino board, which is not explained in this document.
It is strongly recommended to complete the Blockly introductory lab before completing this lab if you have never used Blockly before.
Setup
- Place the Ned2 robotic arm on a table.
- The Ned2 robotic arm must have an obstacle-free perimeter of approximately 60 centimeters in radius.
- Connect the Ned2 robotic arm to the NED robotic arm safety box.
- Connect the safety box of the NED2 robotic arm to the power supply of the NED2 robotic arm.
- Connect the power supply of the NED2 robotic arm to the electrical network.
- Connect the Ned2 robotic arm to NiryoStudio.
- Connect the Arduino box to the Ned2 robotic arm (Once the box is mounted).
Course content
About the Author

Enrolment options
Controlling the Ned2 with an Arduino based control box
- Content Type: Lab
- Programming: Arduino
- Equipment: Bundle STEM
Scenario
The student discovers how to connect and communicate simple instructions between an Arduino and Ned’s Raspberry Pi. In this exercise, the Ned2 robotic arm receives instructions from an Arduino to either bring vials back to an operator, or to take vials from in front of the operator, shake them, and place them in a box. The Robotic Arm is programmed with Blockly and the Arduino is programmed in C++.
The operator must fill vials, mix the contents in the vial by shaking it and then place the vials in a cardboard box.
A: Operator of an assembly line,
B: Vial conveyor
C: NED2 robotic arm control box
D: NED2 robotic arm
1: Bottle holding area
2: Bottle placement area
3: Bottle holding and shaking area
4: Placement area for the stirred bottle (cardboard box)
If the operator touches button 1 of the control box, the robotic arm takes vials from zone 1 and places them in zone 2 until the operator touches button R.
If the operator touches button 2 of the control box, the robotic arm takes bottles from zone 3 and shakes them and places them in zone 4 until the operator touches button R.
If the operator touches the R button immediately after touching button 1 or button 2, the NED2 robotic arm only performs the chosen operation once.
Laboratory Content
Chapter 1: Discovering Blockly
Getting started with Blockly
Chapter 2: Creation of the NED2 robotic arm control box
Assemble a control box which will give orders to the NED2 Robotic Arm using an Arduino microcontroller and 3 capacitive buttons.
Chapter 3: Creating movement sequences for the NED2 robotic arm
Create a movement sequence in Blockly
Create the code interface between the Arduino block and the Ned2.
Required equipment
Ned 2
Adaptative gripper (or other)
![]() NiryoStudio
NiryoStudio![]() Control box (to assemble)
Control box (to assemble)![]() Arduino Nano
Arduino Nano
Control box (to be assembled)
Arduino nano
Arduino Nano
Control box
Arduino Nano (the same code can be used on Arduino UNO or MEGA)
400 point prototype board (30 rows)
Piezo Buzzer
Green LED
Red LED
Two 220k resistors
3 TTP223B capacitive sensors
Male-male and male-female cables
3D printed case (Optional, model downloadable from docs.niryo.com)
Prerequisite knowledge
Basics of building electronic circuits.
The Arduino programming environment, as well as uploading programs to the Arduino board, which is not explained in this document.
It is strongly recommended to complete the Blockly introductory lab before completing this lab if you have never used Blockly before.
Setup
- Place the Ned2 robotic arm on a table.
- The Ned2 robotic arm must have an obstacle-free perimeter of approximately 60 centimeters in radius.
- Connect the Ned2 robotic arm to the NED robotic arm safety box.
- Connect the safety box of the NED2 robotic arm to the power supply of the NED2 robotic arm.
- Connect the power supply of the NED2 robotic arm to the electrical network.
- Connect the Ned2 robotic arm to NiryoStudio.
- Connect the Arduino box to the Ned2 robotic arm (Once the box is mounted).
- Enrolled students: 37
- Content Type: Lab
- Programming: Arduino
- Equipment: Bundle STEM
This course includes
Resources