Introduction
Cursos etiquetado con "Introduction"

Welcome to your onboarding course for the Ned2 and the Discovery Bundle – designed for teachers.
This course provides a step-by-step guide to help you set up and start using your Ned2 robot and its accessories in an educational environment.
Throughout the course, you will learn how to:
-
Unpack and prepare your Discovery Bundle
-
Set up and connect the Ned2 robot using NiryoStudio
- Install and control accessories (grippers, conveyor belt, vision set)
-
Program the robot using Blockly and Python, through classroom-ready examples
By the end of this course, you’ll have everything you need to start integrating the Ned2 into your lessons and guide your students in hands-on robotics activities.
🎯 Designed for teachers. Ready for the classroom. Let’s get started!
- Estudiantes inscritos: 27
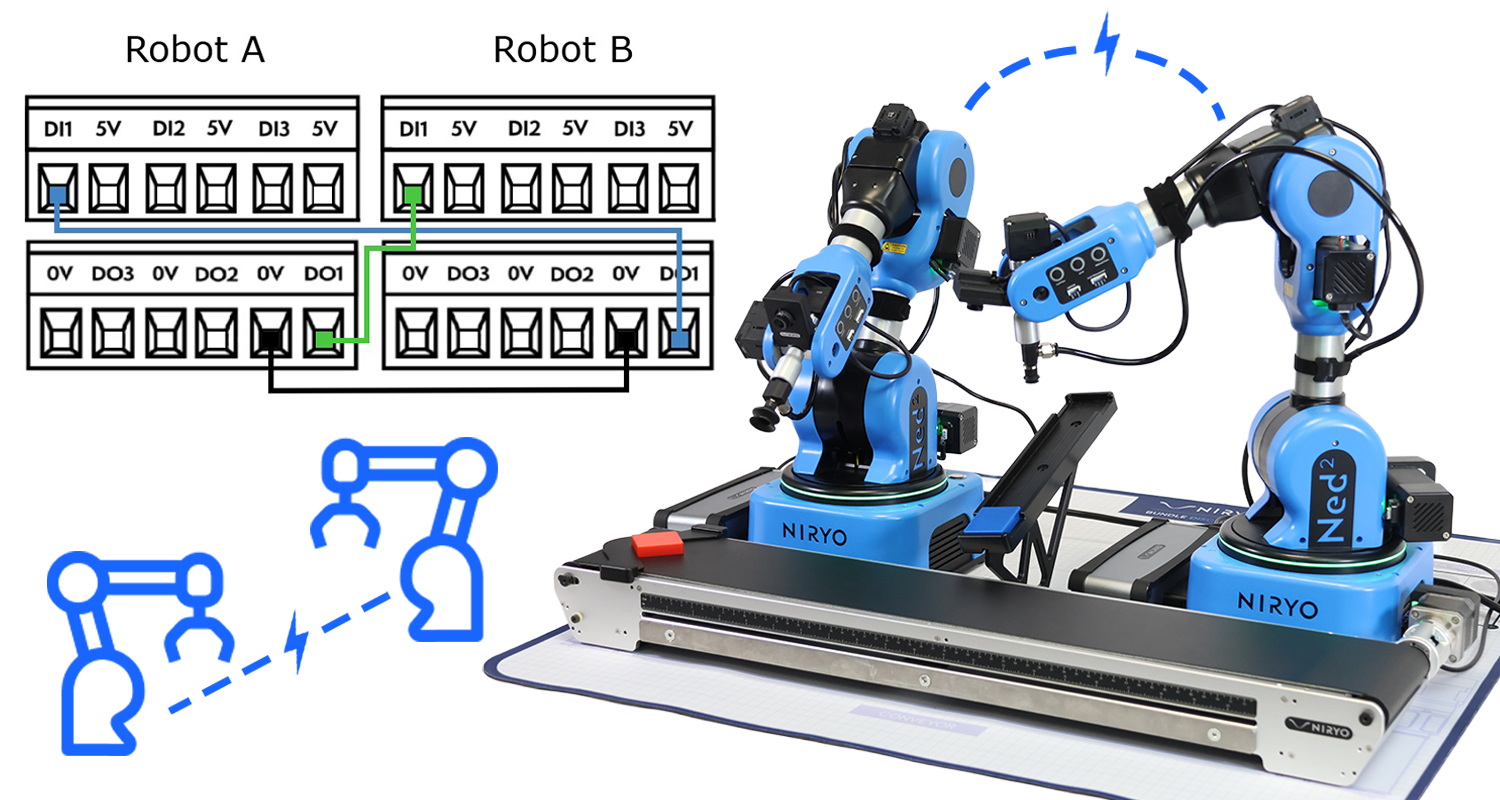
2 Ned2 working in a shared zone
- Content Type: Tutorial
- Equipment: Ned2
- Estudiantes inscritos: No hay estudiantes matriculados en este curso.
Robótica, programación por bloques & automatización
- Length: 35h
- Content Type: Curriculum
- Programming: Blockly
- Equipment: Bundle discovery
📦 Parte del Niryo CTE Pack: Descubre el Robotics & Block Programming Pack
Descubre el mundo de la robótica con nuestro programa completo, diseñado para estudiantes y educadores interesados en explorar los fundamentos de la automatización, la programación y las aplicaciones robóticas. Este curso guía a los alumnos desde los conceptos básicos de la historia de la robótica hasta la programación práctica y la automatización industrial utilizando el robot colaborativo NED2 (cobot) y la programación Blockly.
¿A quién va dirigido este curso?
- ✔️ Estudiantes de secundaria y universitarios en programas CTE o STEM
- ✔️ Educadores que buscan un currículo estructurado de robótica
- ✔️ Principiantes que desean aprender automatización robótica sin necesidad de programar
- ✔️ Cualquier persona interesada en la robótica industrial y la automatización
¡Únete hoy y da tu primer paso hacia el dominio de la robótica y la automatización! 🚀
Este curso permite a los estudiantes obtener las certificaciones SACA C-103 y C-215

- Profesor: Malcom Niryo
- Estudiantes inscritos: 226
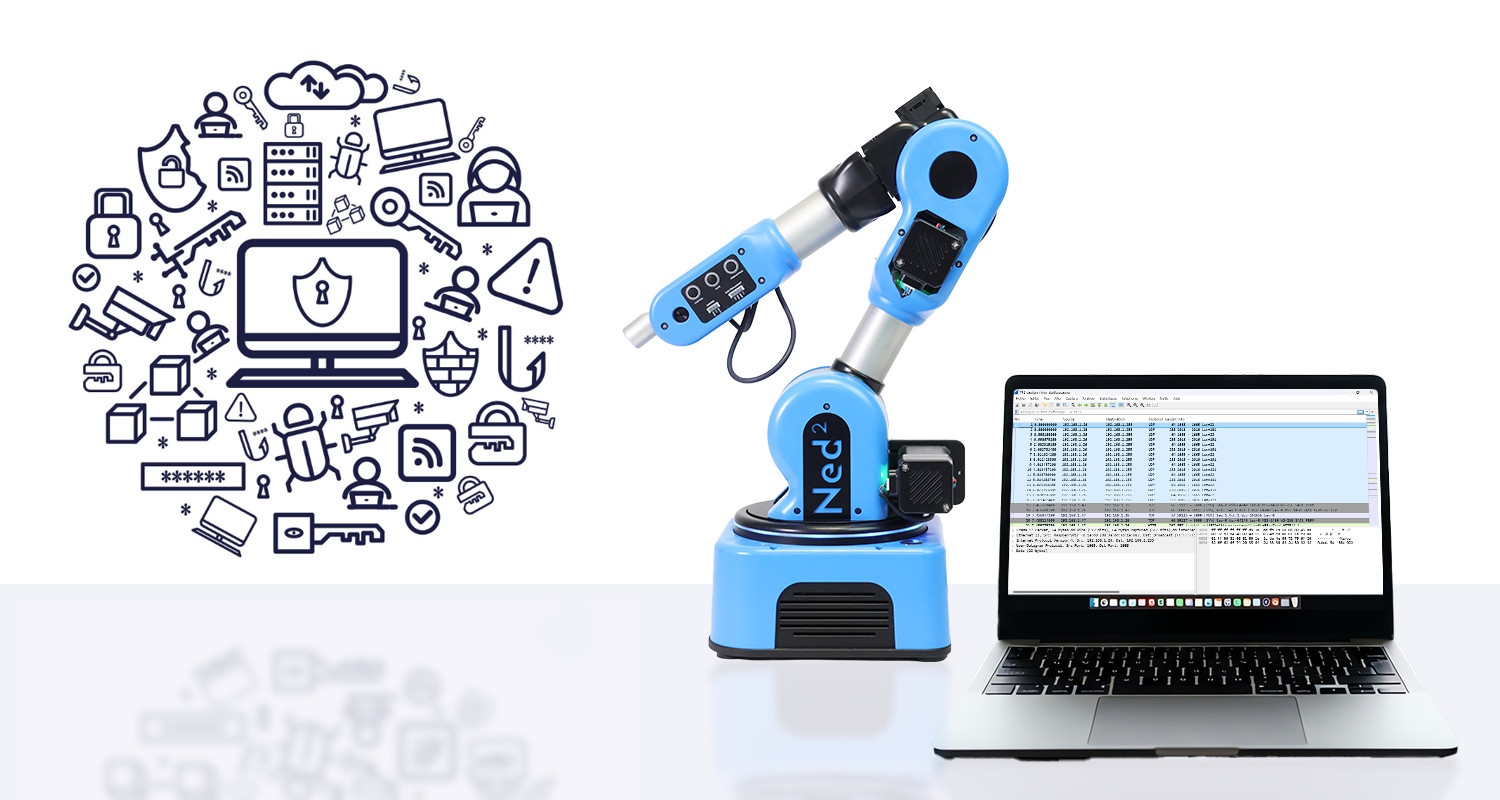
Cybersecurity applied to real world robotics
- Length: 25h
- Content Type: Curriculum
- Programming: Python
- Equipment: Ned2
📦 Part of the Niryo Cybersecurity Pack: Discover the Cybersecurity Pack Solution
Secure the Industry of the Future with Ned2
Master the security of physical systems with our program: "Cybersecurity Applied to Robotics." By using the Ned2 robotic arm, students move beyond abstraction to understand the real-world impact of a digital vulnerability on the physical world. This course transforms the learner’s perspective from a naive view to critical expertise through an immersive industrial scenario.
What will you learn?
- Risk analysis, threat modeling, and understanding the Confidentiality – Integrity – Availability (CIA) model applied to a real industrial system using the Ned2 robot.
- Security auditing, securing, and hardening of a connected robotic system (network, access control, services, and monitoring).
- Mastery of network fundamentals and the use of professional analysis, diagnostic, and supervision tools.
- Understanding and applying the core principles of cryptography.
- Attack simulation, post-incident analysis, and the implementation of defense strategies tailored to a connected environment.
- Developing an industrial cyber-culture and the ability to evaluate the concrete impact of a breach on a physical system.
Who is this course for?
- Higher Education & Vocational Students: Ideal for US CTE programs, Associate Degrees, or UK T-Levels.
- Cybersecurity Beginners looking to discover the field through a structured, accessible, and hands-on methodology.
- Specialized Training focused on Robotics, Automation, Embedded Systems, or Industrial Control Systems (ICS) Security.
- Estudiantes inscritos: 159
STEM Curriculum
- Length: 35h
- Content Type: Curriculum
- Programming: Blockly
- Equipment: Bundle STEM
📦 Parte del Niryo STEM Pack: Descubre la Solución Completa del STEM Pack
Diseñado específicamente para programas STEM, este camino de aprendizaje guía a estudiantes y profesores a través de una exploración práctica de la robótica moderna. A través de un enfoque interdisciplinario que combina ciencia, tecnología, ingeniería y matemáticas, los estudiantes exploran los fundamentos de la robótica, la automatización y la programación visual. Es un recurso ideal para introducir a los jóvenes en las habilidades clave del mañana y capacitarlos para comprender, manipular y diseñar sistemas robóticos inteligentes.
¿A quién va dirigido este curso?
- ✔️ Para profesores de STEM (ciencia, tecnología, ingeniería, matemáticas)
- ✔️ Aplicación práctica de conceptos de robótica
- ✔️ Desafíos divertidos y prácticos para animar sus clases, talleres o clubes de robótica
- ✔️ Desarrollo de la lógica, la creatividad y el trabajo en equipo
- Estudiantes inscritos: 171

My First Automation with Blockly
- Content Type: Lab
- Programming: Blockly
- Equipment: Bundle discovery
Learn how to run your first automation with Blockly
In this course, you will program your Ned2 robot to detect, pick, and place objects autonomously using Blockly.
Step by step, you will learn how to combine vision, conveyor control, and robot movements to complete a full automation cycle.
Prerequisites:
- Estudiantes inscritos: 112
PID Tuning for a Pick & Place
- Length: 4h
- Content Type: Lab
- Programming: Blockly
- Equipment: Ned2
⚠️ Required Add-on Module
To complete this course, activating the free "PID" add-on module in NiryoStudio is necessary. To activate it, please contact the NiryoSuccess team: customersuccess@niryo.com
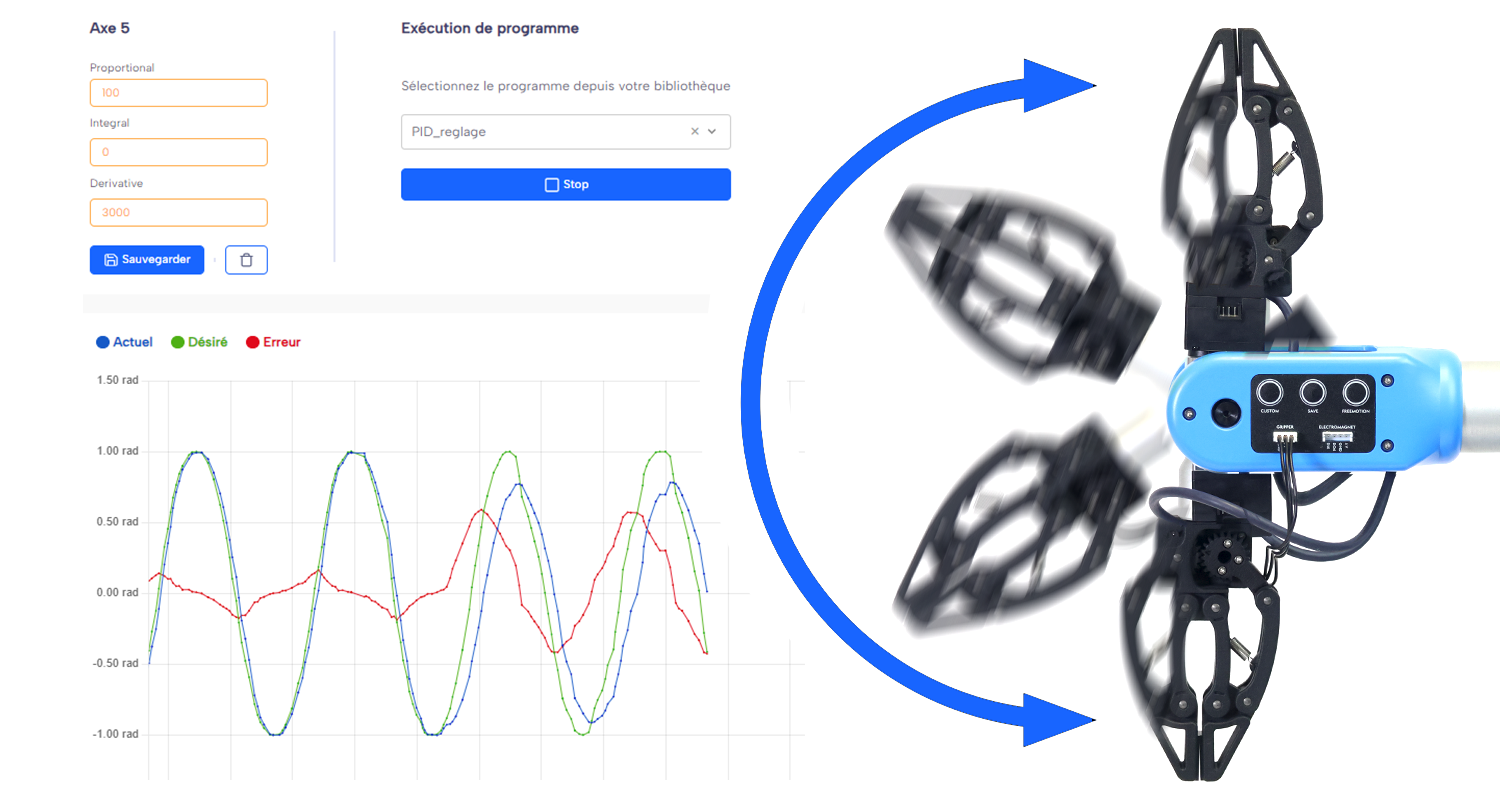
Precision Pick & Place with Axis 5 PID Control
This hands-on activity extends the PID control workshop by applying theory to a real-world robotic challenge: achieving smooth and precise pick & place movements using the wrist joint (axis 5) of the Niryo robot.
Through guided experimentation, you’ll explore how proportional (P), integral (I), and derivative (D) gains affect motion behavior — from responsiveness and stability to precision. You’ll then apply your understanding to tune the PID parameters for a realistic industrial task: performing accurate and vibration-free pick & place operations.
The activity combines theory, experimentation, and creativity, culminating in a final challenge — stacking objects to form a stable tower using optimal PID tuning.
- Estudiantes inscritos: 36

From Blockly to Python with the Ned2 Robot
- Length: 8
- Content Type: Lab
- Programming: Python
- Equipment: Simulation
🎓 From Blockly to Python with the Ned2 Robot
This course guides learners through the gradual transition from visual programming with Blockly to text-based programming in Python, using the collaborative Ned 2 robot.
Through three complementary units, students strengthen their programming logic skills, discover the basics of Python, and create their first complete scripts to control a real robot.
Unit 1 — Advanced Blockly
Students deepen their knowledge in visual programming with Blockly.
They learn to structure programs, adopt best development practices (modularity, clarity, code reusability), and solve more complex problems using the Ned2 robot.
Topics covered:
- Comments
- Sequences
- Variables
- Loops
- Conditions
- Functions
- Lists
Unit 2 — From Blockly to Python
This unit forms the bridge between visual and textual programming.
Through a series of practical challenges, learners discover how Blockly blocks translate into Python instructions, developing an intuitive understanding of the language.
Activity 1 - Compare Blockly and Python
Activity 2 - Predict the robot's behavior
Unit 3 — Python Programming and First Complete Script
Students put their knowledge into practice to write their first complete Python program.
They learn to use the pyniryo library to control the Ned2 robot, structure a standalone script, and understand the Python code execution flow using an IDE.
At the end of this course, learners are able to:
✅ Design structured and efficient programs in Blockly
✅ Understand and write basic Python code
✅ Develop a complete script to control the Ned2 robot
- Estudiantes inscritos: 68
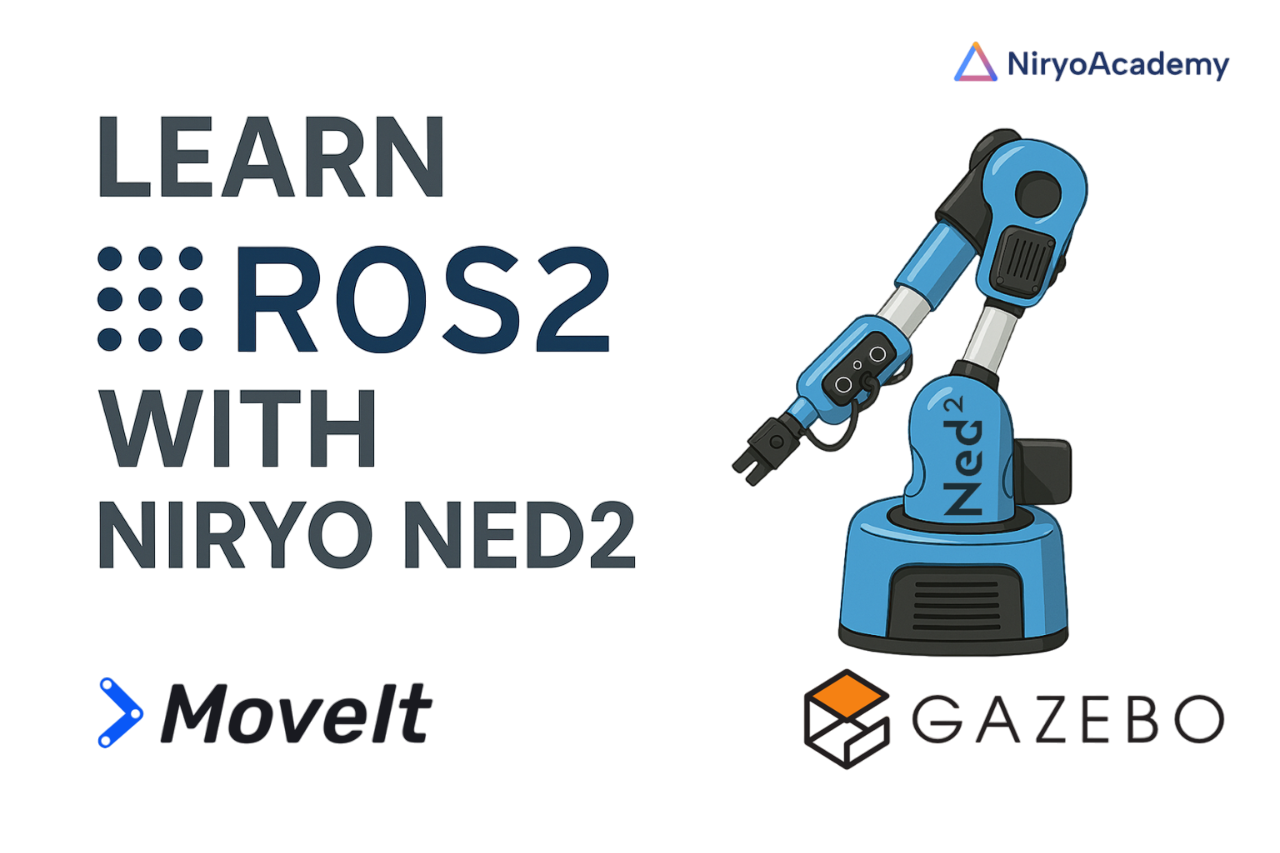
Create your own ROS2 Robotic Stack from scratch
- Length: 25h
- Content Type: Curriculum
- Programming: ROS2
- Equipment: Ned2
🚀 Don’t Just Use Robots... Build Them!
Dive into the world of robotics and learn to design, program, and simulate a Niryo robot in its new ROS2 environment. This course is crafted for college students and tech enthusiasts, opening the door to the latest innovations in robotics.
So, are you ready for the journey? Your adventure starts here!
🎯 Who Is This Course For?
- Bachelor's or Master's students in Robotics, Computer Science, or other STEM-related fields
- Educators looking for a structured, ready-to-use robotics course
- Robotics enthusiasts and fans of the Niryo ecosystem
📚 Course Content
- Setting up your robotics dev environment: Ubuntu 24, ROS2 Jazzy, Gazebo Sim Harmonic
- Modeling a Niryo robot using URDF
- Creating and managing ROS2 packages (with Ament-CMake and colcon)
- Understanding ROS2 architecture and communication protocols
- Installing and configuring the MoveIt2 framework
- Creating a ROS2 Control hardware interface
- Simulating motors and controllers with fake hardware
- Building launch files in Python
- Simulating the complete stack in Gazebo Harmonic
- Enabling ROS2-Gazebo communication via ros-gz bridge
- Intro to motion planning using RRT-Connect with OMPL
Learn by doing. Build real robotic systems. Start mastering ROS2 today!
- Estudiantes inscritos: 157
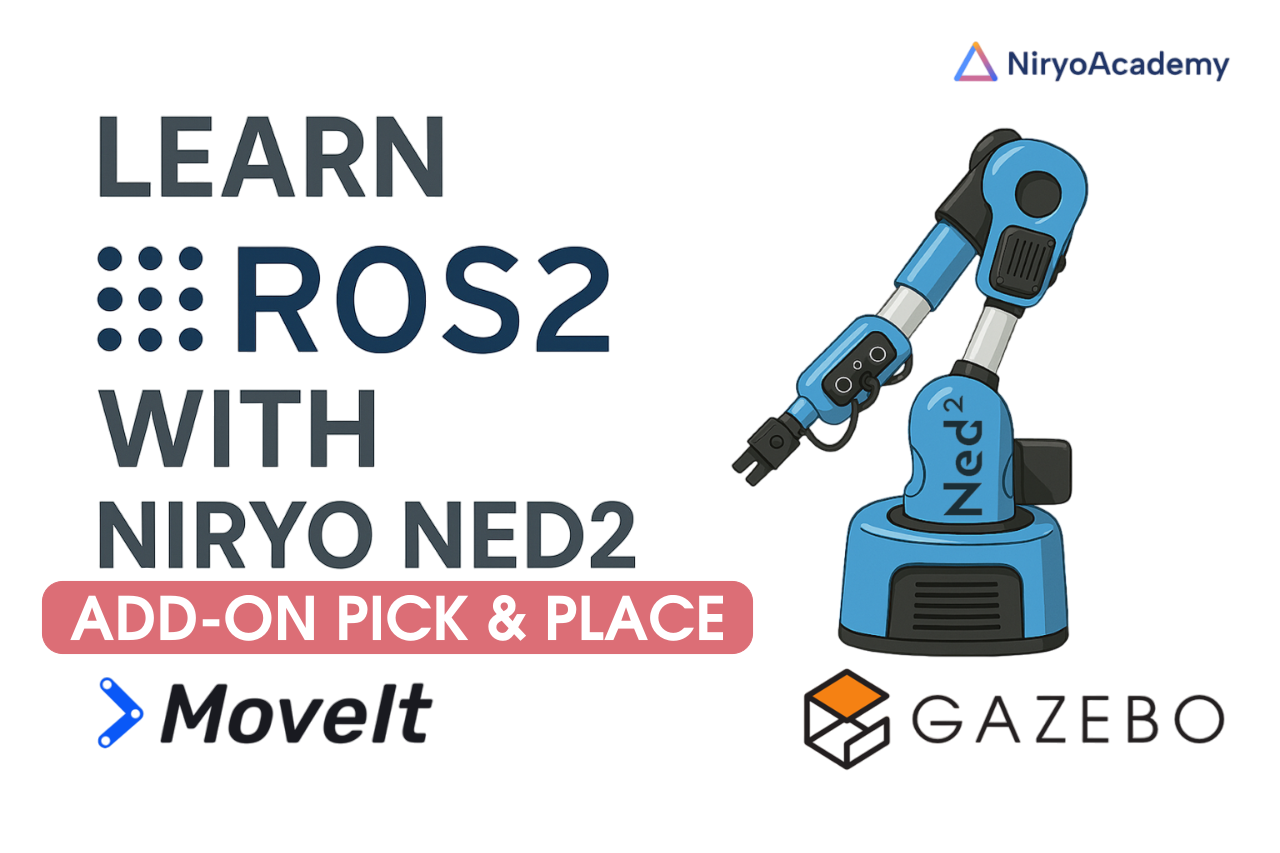
Add-on ROS2 : Perform your first simulated pick and place with the Niryo NED2
- Length: 3h
- Content Type: Add-on
- Programming: ROS2
- Equipment: Ned2 + Vision Set
This add-on introduces a gripper to the simulated robot, enabling basic pick and place functionality. It enhances the realism of the simulation by allowing interaction with objects in the environment.
You will learn how to integrate the gripper, control its motion, and execute simple pick and place tasks using MoveIt2 and Gazebo. This extension is ideal for testing manipulation workflows and preparing for real-world deployment.
Let’s take the simulation a step further.
Course content :
- Adding new components to the robot’s URDF, including the gripper
- Manual setup of ROS2 controllers to control the gripper
- Managing robot poses and action sequences with MoveIt2
- Simulating object physics and interactions in Gazebo
- Using ROS2 services for gripper control and automation
- Estudiantes inscritos: 67
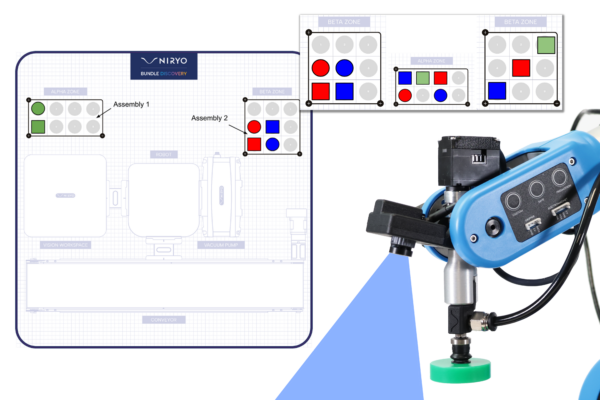
Bundle Discovery : Order Assembly and Preparation
- Length: 6h
- Content Type: Lab
- Programming: Python
- Equipment: Bundle discovery
Scenario
We want to carry out an assembly that involves arranging specific manipulable objects (shape and color) in the ALPHA and BETA zones, in a pattern defined by the user. In order to carry out this assembly, manipulable objects are fed to the robotic arm NED2 by a conveyor. The robotic arm NED2 then identifies the parts before picking them up. If the manipulable object picked up is not required for the pattern, it will be deposited it in the waste area (rejects), otherwise it will be placed it in the ALPHA or BETA zones, following the given pattern.

Lab Contents
Chapter 1: Pick and place
- Define reference points and points of interest in the robotic arm NED2 workspace.
- Create the sequence of movements for a pick-and-place operation.
- Perform a palletizing operation.
Chapter 2: Defining a pattern
- Create an operator input and pattern creation function.
- Determine whether a manipulable object belongs to an existing pattern.
- Trigger the corresponding action for a manipulable object according to the following cases: not belonging to a pattern, belonging to a pattern and already processed, belonging to a pattern and not processed.
Chapter 3: Vision
- Feed the manipulable object via the conveyor
- Master the results of camera object detection: shape, color and position of a manipulable object in a defined workspace.
- Pick up a manipulable object identified by the camera.
Chapter 4: Integration
- Automatically produce a pattern entered by an operator, using manipulable objects supplied by the conveyor.
Prerequisite knowledge
Python: Basic syntax + simple data and control structures + loops + simple function calls
Required components


- Estudiantes inscritos: 162

Getting started with Blockly Pick and Place
- Length: 2h
- Content Type: Lab
- Programming: Blockly
- Equipment: Bundle STEM
Scenario
Students discover the basic functions of the robotic arm NED2. In this exercise, the robotic arm NED2, using the basic blocks of the Blockly “No Code” programming environment, performs a simple operation to pick up and place an object.
Laboratory Content
Chapter 1: Discovering Blockly
- Blockly Overview
- The programming environment
- Blocks to use
Chapter 2: Production of our first sequence
- Create a first position for the Ned2 robotic arm
- Create multiple positions using the “FreeMotion” button and the “Save” button
- Opening and closing the Gripper Custom
- Create a loop sequence
- Add comments in the sequence
Chapter 3: It's your turn!
- Perform a Pick and Place sequence
Required equipment

![]()
- Estudiantes inscritos: 129
Robotic arm Ned2 gesture control with Arduino
- Content Type: Lab
- Programming: Arduino
- Equipment: Bundle discovery
Scenario :
The student discovers how to connect and communicate simple instructions between an Arduino and the Ned2’s Raspberry Pi. In this exercise, the Ned2 robotic arm, depending on the gesture made by the operator, carries out
different operations with bottles. The Robotic Arm is programmed with Blockly and the Arduino is programmed in C++.
This exercise simulates the interaction of an assembly line operator with a robot to optimize “TAKT TIME”.
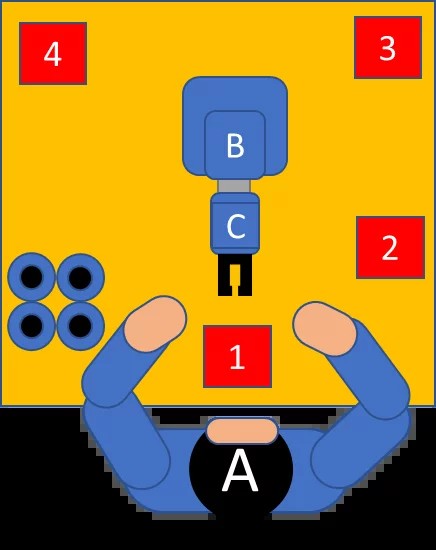
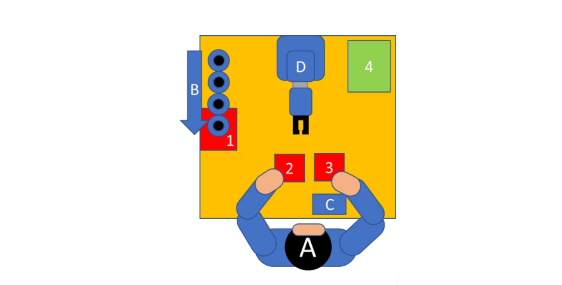
The operator works on an assembly line which prepares 3 products: Perfume, Cologne and Eau de Toilette. Depending on the preparation, the Ned2 robotic arm (B) must:
- In the case of perfume: take the bottle from position 1 and position it to the left of the operator in position 4.
- In the case of Cologne: take the bottle from position 1, move it from right to left and turn it several times, then position it to the right of the operator in position 2.
- In the case of an Eau de Toilette: take the bottle from position 1, shake it with the bottle horizontally and place it in the rear right corner of the table in position 3.
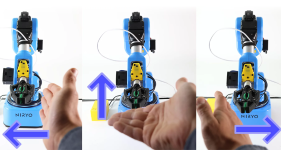
To indicate to the NED2 robotic arm to perform one of the three operations, the operator makes a hand gesture in front of the gesture sensor located on the NED2 robotic arm, a gesture which is interpreted by Ned2 Robotic Arm.
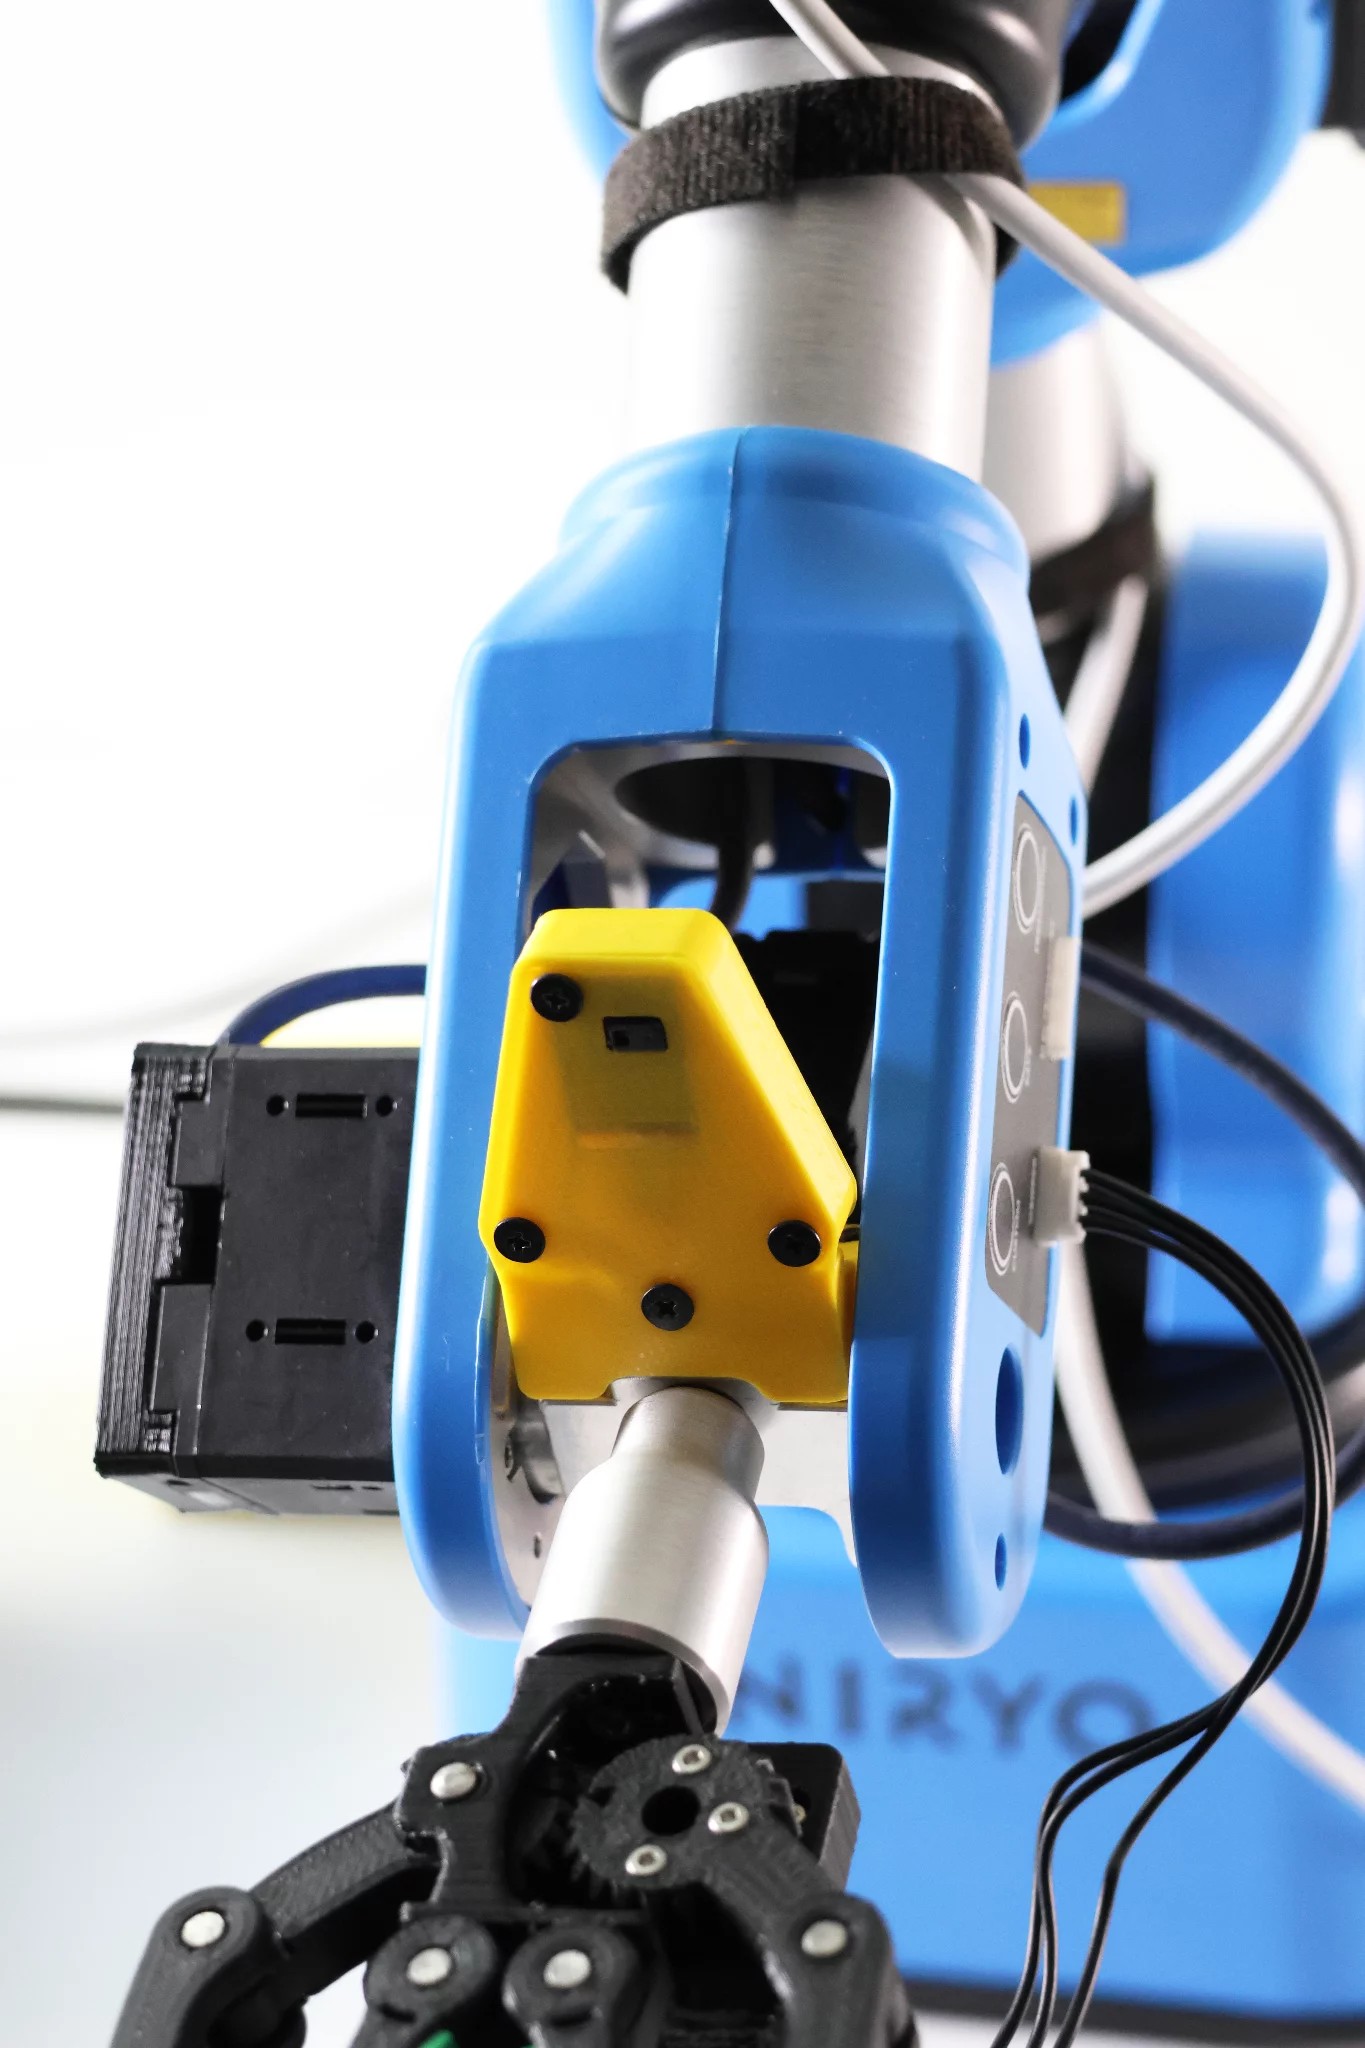
The gesture sensor is connected to an Arduino Nano and the Arduino Nano is connected to the digital pins on the back panel of the Ned2 robotic arm.
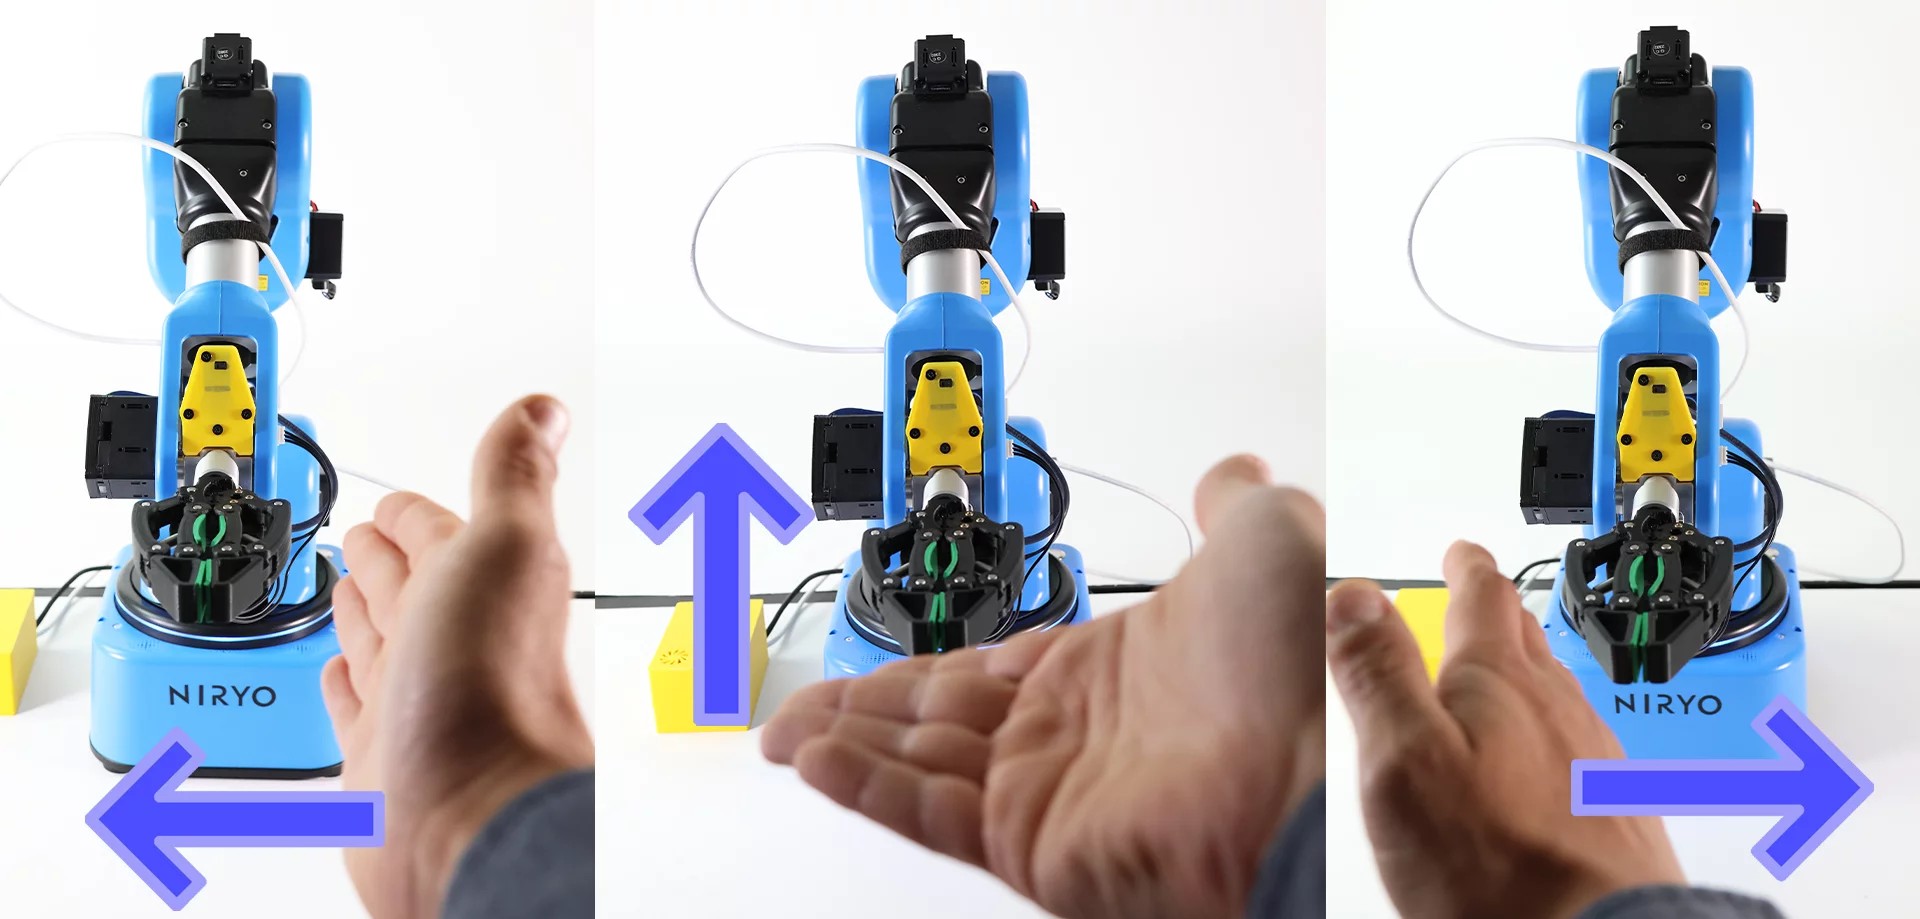
The gesture sensor is capable of interpreting 9 gestures:
- Up
- Down
- Left
- Right
- Forwards
- Backwards
- Clockwise rotation
- Counterclockwise rotation
- Undulation
In this exercise, we will only use 4 gestures:
- Up
- Down
- Left
- Right
There are two gestures, up and down, that we are going to use for the same movement of the NED2 robotic arm, since, during the tests, the operators did not remember whether they should move their hand upward or downwards.
Laboratory Content
Chapter 1: Discovering Blockly
- Blockly overview
Chapter 2: Creating the gesture recognition module
- Create an accessory for the NED2 robotic arm capable of giving orders to the NED2 Robotic Arm using an Arduino microcontroller and a PAJ7620 sensor
Chapter 3: Creating movement sequences for the NED2 robotic arm
- Create a sequence of trajectories
Required equipment
 Ned 2
Ned 2
 Adaptative Gripper (or other)
![]() NiryoStudio
NiryoStudio![]() Arduino Nano
Arduino Nano
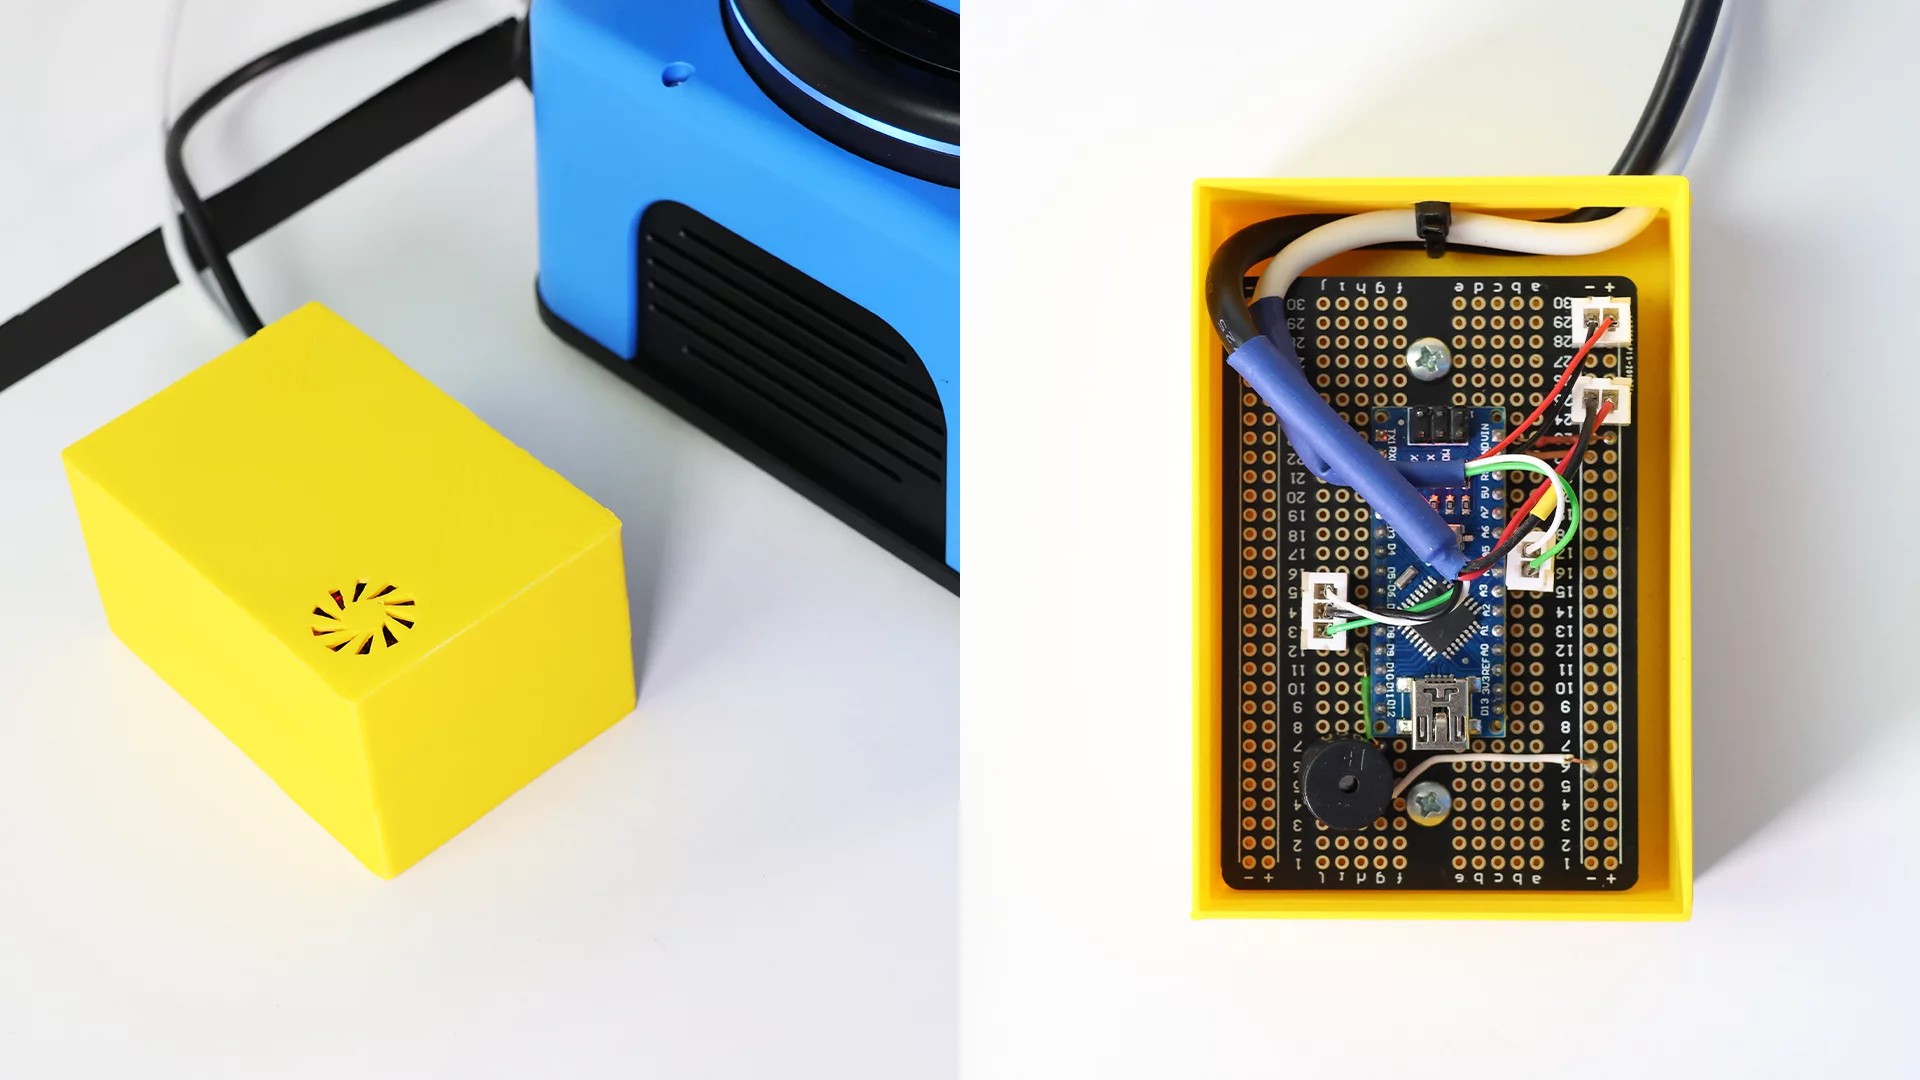
Other tools:
- 400 point prototype board (30 rows)
- Piezo Buzzer
- PAJ7620 motion sensor
- Male-male and male-female electric cables
Prerequisite knowledge:
The installation of the Arduino programming environment, as well as the uploading of the Arduino program is not explained in this document.
It is strongly recommended to complete the Blockly getting started lab and the Ned2 control lab with Arduino box before completing this lab if you are not used to using Blockly.
Setup:
- Place the Ned2 robotic arm on a table.
- The Ned2 robotic arm must have an obstacle-free perimeter of approximately 60 centimeters in radius.
- Connect the Ned2 robotic arm to the NED2 robotic arm safety box
- Connect the safety box of the NED2 robotic arm to the power supply of the NED2 robotic arm
- Connect the power supply of the NED2 robotic arm to the electrical network
- Connect the Ned2 robotic arm to NiryoStudio
- Connect the Arduino box to the Ned2 robotic arm (Once the box is mounted)
- Estudiantes inscritos: 52
Controlling the Ned2 with an Arduino based control box
- Content Type: Lab
- Programming: Arduino
- Equipment: Bundle STEM
Scenario
The student discovers how to connect and communicate simple instructions between an Arduino and Ned’s Raspberry Pi. In this exercise, the Ned2 robotic arm receives instructions from an Arduino to either bring vials back to an operator, or to take vials from in front of the operator, shake them, and place them in a box. The Robotic Arm is programmed with Blockly and the Arduino is programmed in C++.

The operator must fill vials, mix the contents in the vial by shaking it and then place the vials in a cardboard box.
A: Operator of an assembly line,
B: Vial conveyor
C: NED2 robotic arm control box
D: NED2 robotic arm
1: Bottle holding area
2: Bottle placement area
3: Bottle holding and shaking area
4: Placement area for the stirred bottle (cardboard box)
If the operator touches button 1 of the control box, the robotic arm takes vials from zone 1 and places them in zone 2 until the operator touches button R.
If the operator touches button 2 of the control box, the robotic arm takes bottles from zone 3 and shakes them and places them in zone 4 until the operator touches button R.
If the operator touches the R button immediately after touching button 1 or button 2, the NED2 robotic arm only performs the chosen operation once.
Laboratory Content
Chapter 1: Discovering Blockly
Getting started with Blockly
Chapter 2: Creation of the NED2 robotic arm control box
Assemble a control box which will give orders to the NED2 Robotic Arm using an Arduino microcontroller and 3 capacitive buttons.
Chapter 3: Creating movement sequences for the NED2 robotic arm
Create a movement sequence in Blockly
Create the code interface between the Arduino block and the Ned2.
Required equipment
 Ned 2
Ned 2
 Adaptative gripper (or other)
![]() NiryoStudio
NiryoStudio![]() Control box (to assemble)
Control box (to assemble)![]() Arduino Nano
Arduino Nano
Control box (to be assembled)
Arduino nano
Arduino Nano
Control box
Arduino Nano (the same code can be used on Arduino UNO or MEGA)
400 point prototype board (30 rows)
Piezo Buzzer
Green LED
Red LED
Two 220k resistors
3 TTP223B capacitive sensors
Male-male and male-female cables
3D printed case (Optional, model downloadable from docs.niryo.com)
Prerequisite knowledge
Basics of building electronic circuits.
The Arduino programming environment, as well as uploading programs to the Arduino board, which is not explained in this document.
It is strongly recommended to complete the Blockly introductory lab before completing this lab if you have never used Blockly before.
Setup
- Place the Ned2 robotic arm on a table.
- The Ned2 robotic arm must have an obstacle-free perimeter of approximately 60 centimeters in radius.
- Connect the Ned2 robotic arm to the NED robotic arm safety box.
- Connect the safety box of the NED2 robotic arm to the power supply of the NED2 robotic arm.
- Connect the power supply of the NED2 robotic arm to the electrical network.
- Connect the Ned2 robotic arm to NiryoStudio.
- Connect the Arduino box to the Ned2 robotic arm (Once the box is mounted).
- Estudiantes inscritos: 37
Discovering the 6 axes of the NED2 Robotic Arm
- Content Type: Lab
- Programming: Blockly
- Equipment: Bundle STEM
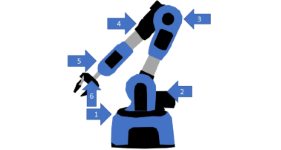
The student discovers the concept of the 6 axes and how it applies to Ned2.
In this exercise, the Ned2 robotic arm will be used to move an object, and will be positioned in a singularity.
Laboratory Content
Chapter 1 : The Six-Axis Robotic Arm: An Imitation of the Human Arm
- Understand the concept of the 6 axes and how it applies to Ned2.
Chapter 2 : Activities: The 6 axes of the Ned2 Robotic Arm
- Discover direct movements
Chapter 3: The Work Envelope and Singularities
- Discover the concepts of work envelope and singularity.
Chapter 4: Activity: Creating a Singularity
- Have the NED2 Robotic Arm make an “unnecessary” movement.
Required equipment
 Ned 2
Ned 2 Adaptative gripper (or other)
![]() NiryoStudio
NiryoStudio
Setup
- Place the Ned2 robotic arm on a table.
- The Ned2 robotic arm must have an obstacle-free perimeter of approximately 60 centimeters in radius.
- Connect the Ned2 robotic arm to the NED2 robotic arm safety box.
- Connect the safety box of the NED2 robotic arm to the power supply of the NED2 robotic arm.
- Connect the power supply of the NED2 robotic arm to the electrical network.
- Connect the Ned2 robotic arm to NiryoStudio.
- Estudiantes inscritos: 107
Voice control of the Ned2 with Arduino
- Length: 4h
- Content Type: Lab
- Programming: Arduino
- Equipment: Bundle STEM
Scenario
The student discovers how to connect and communicate simple instructions between an Arduino and the Ned2’s Raspberry Pi. In this exercise, the Ned2 robotic arm, depending on the word said by the operator, brings bins with parts within the operator’s reach. The Robotic Arm is programmed with Blockly and the Arduino is programmed in C++.
This exercise simulates the interaction of an assembly line operator with a cobot to optimize “TAKT TIME”.
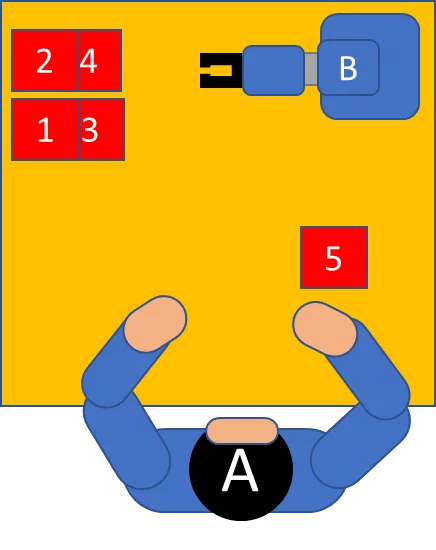
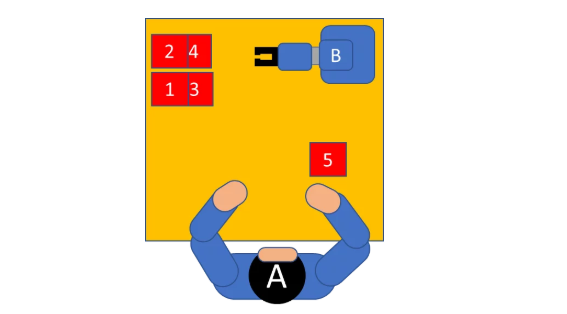
The operator (A) works on an assembly line that produces small household appliances. This operator is at the end of the line and tests the finished products. On the product, 4 elements may have a defect. If the operator detects a problem, they asks the robotic arm to provide them with a component to replace the defective element.
The 4 elements that can be replaced are in containers in positions 1, 2, 3 and 4. When the operator names a defective component (for example: Button, Fan, Switch, Cable) the NED2 robotic arm (B) takes the container with the requested component and positions it for 5 seconds in position 5 so that the operator can take the necessary part.
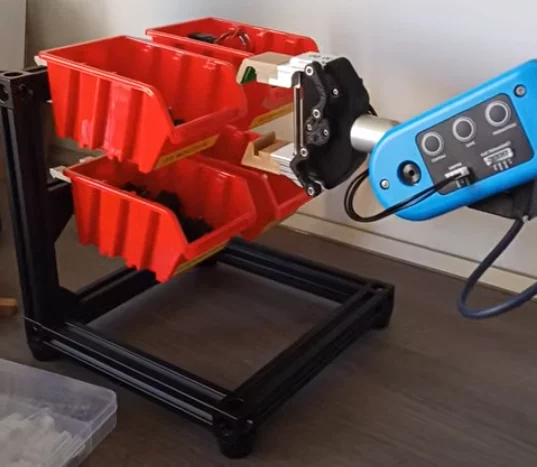
The voice recognition module is connected to an Arduino Nano and the Arduino Nano is connected to the digital pins on the rear panel of the Ned2 robotic arm.
The voice recognition module must be trained with the operator’s voice. To do this, using the microphone, the training program supplied with the Elechouse v3 module driver asks the operator to say each word to identify a bin several times.
Laboratory Content
Chapter 1: Discovering Blockly
- Blockly Overview
Chapter 2: Creating the voice recognition module
- Create an accessory for the NED2 Robotic Arm capable of giving orders to the NED2 Robotic Arm using an Arduino microcontroller and ELECHOUSE v3 voice recognition module.
Chapter 3: Creating movement sequences for the NED2 robotic arm
- Perform a Pick and Place sequence
Required equipment
 Ned2
Ned2
 Adaptive gripper
![]() NiryoStudio
NiryoStudio
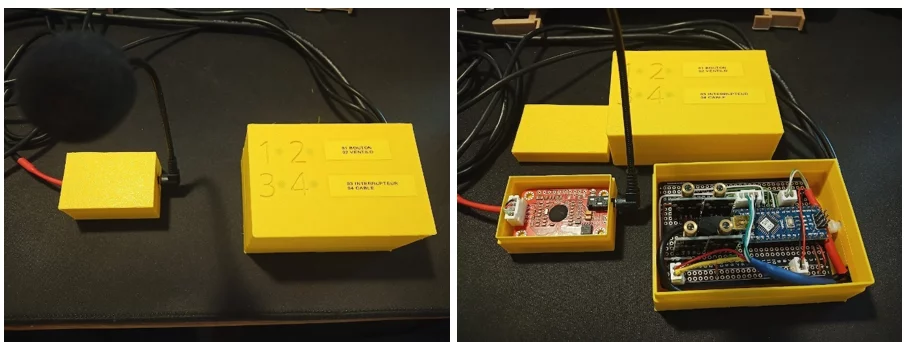
![]() Arduino Nano
Arduino Nano
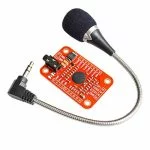 ELECHOUSE v3
Prerequisite knowledge
- The installation of the Arduino programming environment, as well as the uploading of the Arduino program is not explained in this document.
- It is strongly recommended to complete the Getting started with Blockly lab and the Ned2 control lab with Arduino box before completing this lab if you are not used to using Blockly.
Setup
- Place the Ned2 robotic arm on a table.
- The Ned2 robotic arm must have an obstacle-free perimeter of approximately 60 centimeters in radius.
- Connect the Ned2 robotic arm to the NED2 robotic arm safety box
- Connect the safety box of the NED2 robotic arm to the power supply of the NED2 robotic arm
- Connect the power supply of the NED2 robotic arm to the electrical network
- Connect the Ned2 robotic arm to NiryoStudio
- Connect the Arduino box to the Ned2 robotic arm (Once the box is mounted)
- Estudiantes inscritos: 25